Norming Resource Manager 2026 Now Available
July 2 2026
Dear Partners,
We are pleased to announce the official launch of Norming Resource Manager 2026. This release focuses on three areas:
1. Implementation Tool Optimization
2. API Capabilities
3. New Features & Functional Improvements
Please refer to the details below.
Part I - Implementation Tool Optimization
Copy R/M Setup Data Utility
Purpose of the tool
At the implementation stage, a handy tool is very helpful to fast copy the R/M Setup settings from a test database to a live database, or from one formal database to another formal database (in which R/M has not been configured).
Prerequisite
This utility will override all the R/M settings in the target database. To prevent any data loss or corruption, only the companies in which Resource Manager is newly activated can be selected as the target companies, which means, no setup data and transaction data exists.
How to use the tool
Go to Sage 300 > Resource Manager > Implementation Tools menu, open the 'Copy R/M Setup Data' icon for the following screen.
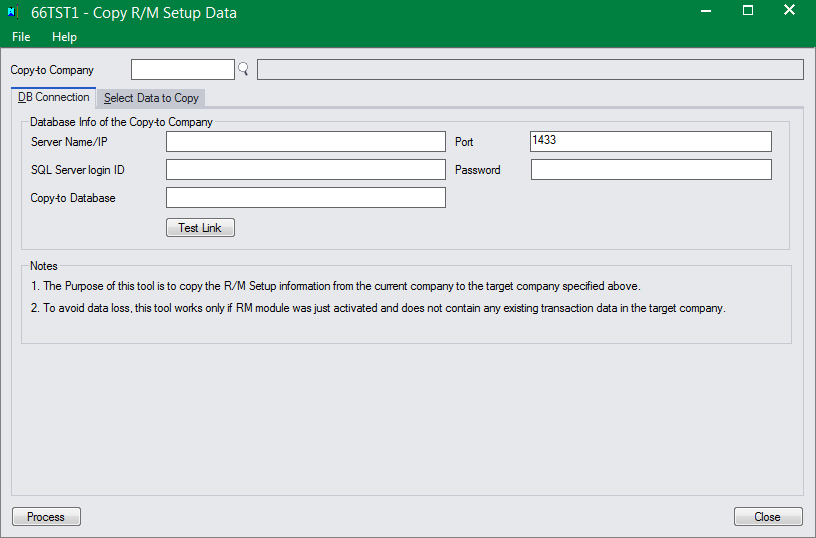
Step 1 - Select the target company for the 'Copy-to Company' field.
Step 2 - In the 'DB Connection' page, specify the database information for the Copy-to company, then click the 'Test Connection' button to check whether the database connection works.
Step 3 - Go to the 'Select Data to Copy' page to select the settings you want to copy to the target company.
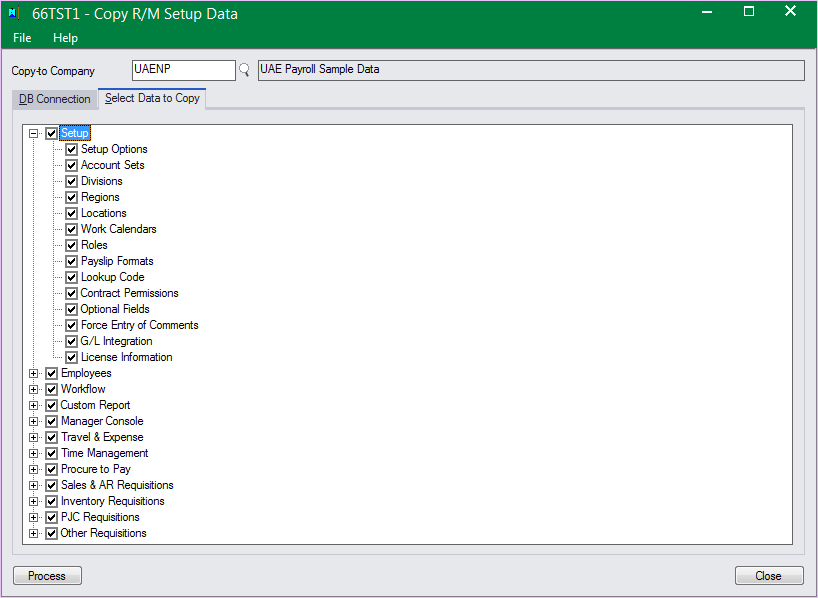
Note: Based on the settings and modules enabled in current company, some setup icons might be hidden.
Step 4 - Click the 'Process' button to proceed the copying. Once finished, the following message will pop up:
The selected settings have been successfully copied to company UAENP (Database: UAEPAYROLL).
Approval Workflow Wizard
Purpose of the tool
Approval workflow is huge to every organization, and this capability is one of the key values that Norming brings to our customers. Based on our experience, we found that configuring approval workflow is always a time-consuming part of the implementation process. To speed up configuring approval workflows, this Approval Workflow Wizard utility is provided to guide you through the workflow configuration process one step by another.
Prerequisite
Before using the wizard, the following settings should have been completed:
- Global Options.
- Some relevant Setup icons under Resource Manager > Setup menu.
- Employee Register under Resource Manager > Employees menu.
- E-mail templates under Resource Manager > Approval Workflow menu.
- If some approval levels(steps) require an approval group to approve, the employee groups at Resource Manager > Approval Workflow menu should be defined first.
Suggestion
Whether using this wizard or the main screen to define a workflow, it is strongly recommended to draw the approval workflow diagram down before defining it. This diagram not only provides you with a clear view of the entire approval workflow, but can also be used to validate the workflow setup.
How to use the module
Go to Sage 300 > Resource Manager > Approval Workflow menu, open the 'Approval Workflow' screen and click the 'Wizard' button.
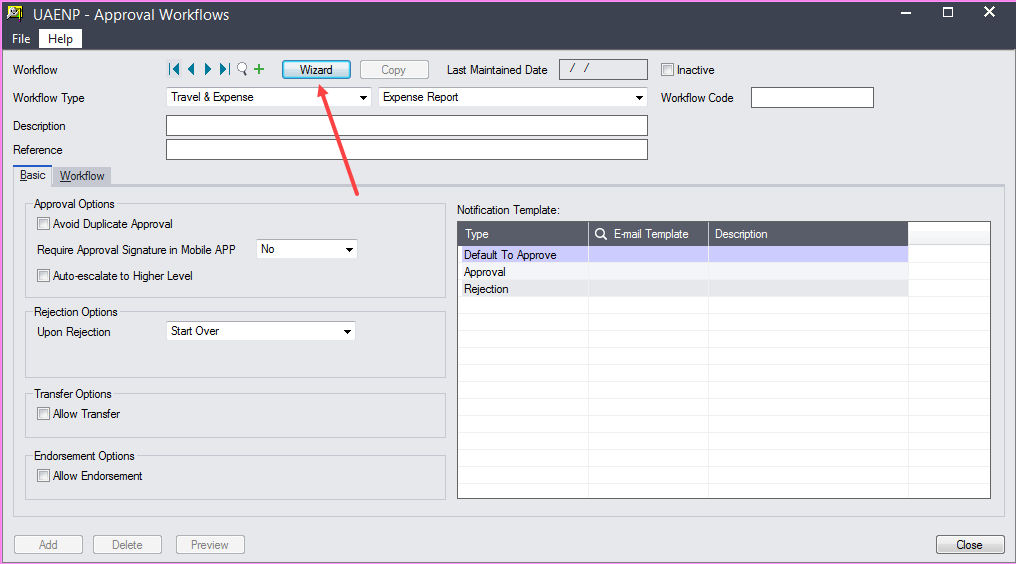
Upon clicking the above button, the following screen appears.
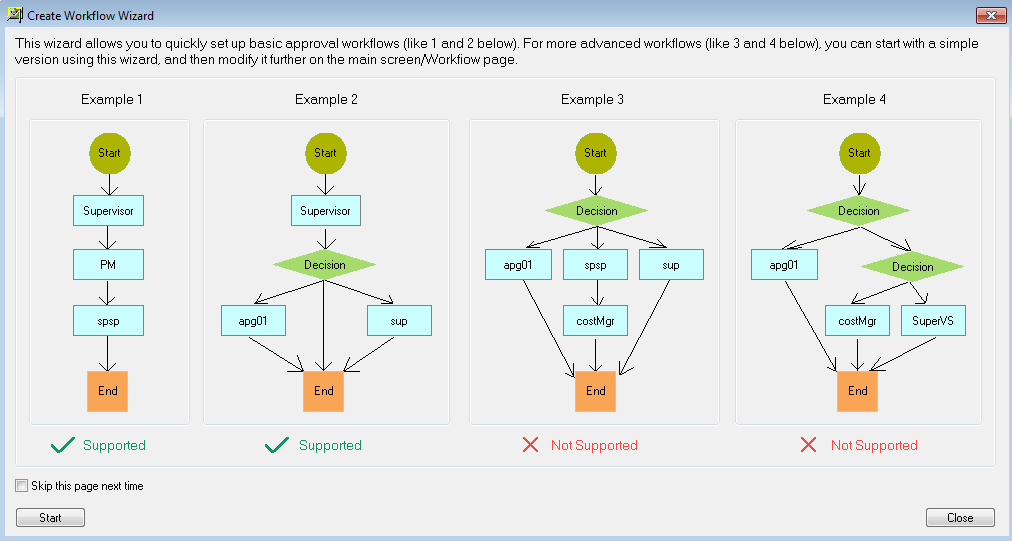
This is an information form which tells the limitation of the wizard - it's not able to cover some complicated workflows, like example 3 and 4, but you can start with a simple version with the wizard, then modify it using the main screen of the approval workflow.
Select the 'Skip this page next time' option if you want to skip this form in future use of this functionality.
Step 1 - Define some basic and default information for the new approval workflow
Click the 'Start' button on the above screen for the following form, where to select a workflow type, specify workflow code, description, and give default E-mail alert templates respectively for next approver('To Approve'), endorser('To Endorse') or the re-assigned approver('Transfer-to') specified by the current approver.
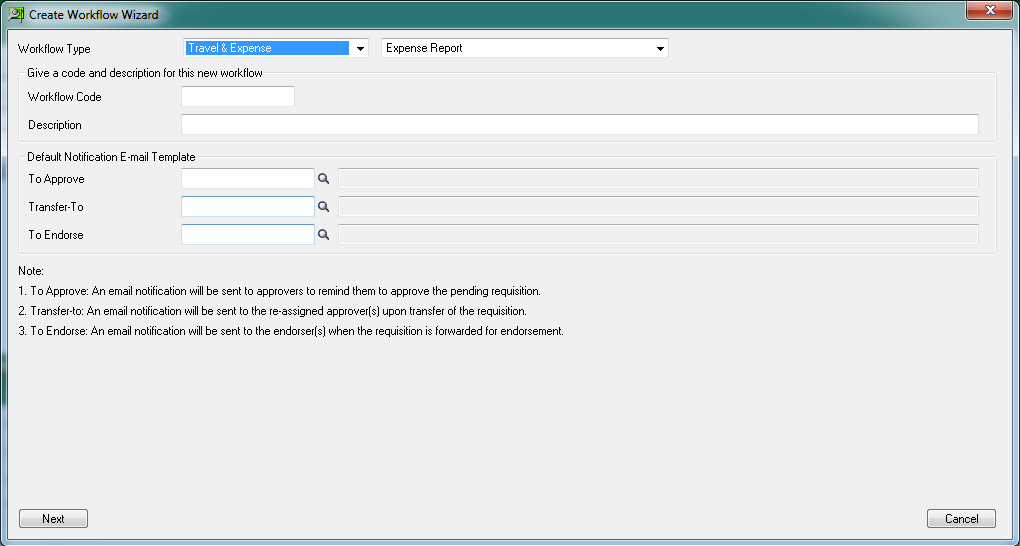
Click the 'Next' button on the above screen to define the approval steps.
Step 2 - Define the approval steps
An approval level could be an approver or a condition step.
Define an Approver Step
If this step is approved by an approver(or an approver group), select the 'Approver' option.
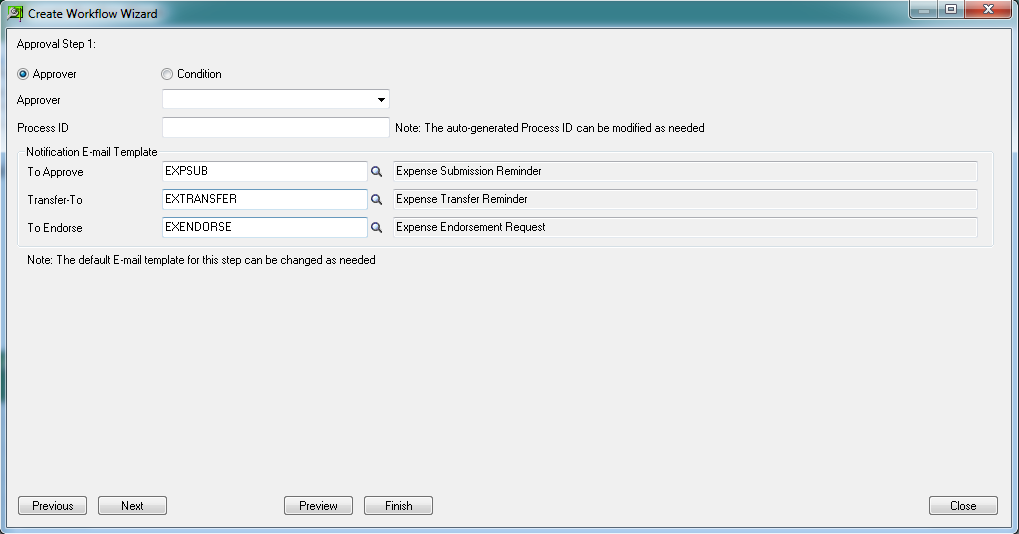
For the 'Approver' step, select an approver(role) to approve this step. Based on the settings in Global Options, the approver can be Submitter, Specific Employee, Supervisor, Region Manager, Division Manager, Department Manager, Cost Center Manager, Job Manager, Employee Group, PJC Contract Manager. If all these standard approver roles cannot meet your requirement, you can create a custom role with the Custom Role/Variable functionality.
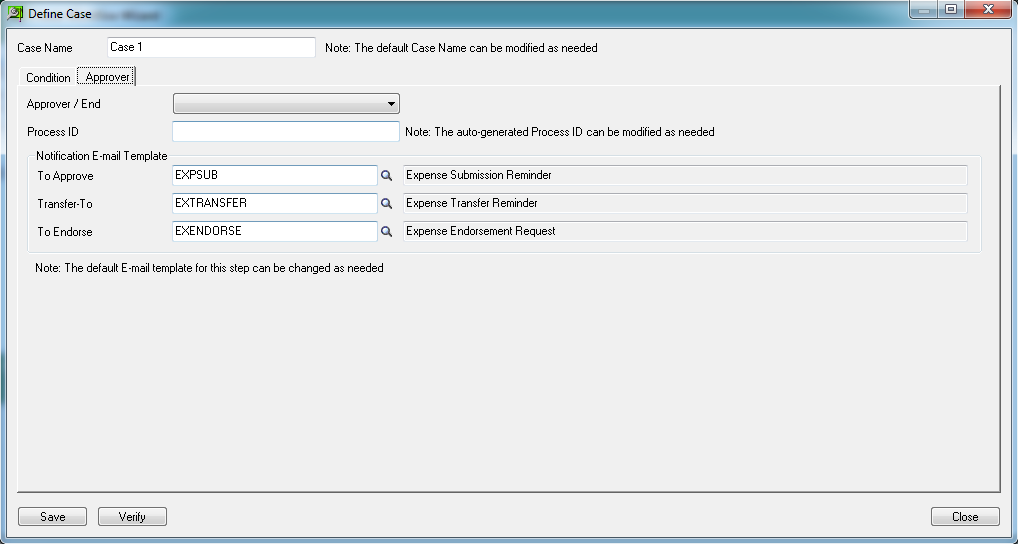
Modify the Email alert templates for this step if required.
Define a Condition Step
If this is a condition step - which means approvers might be different under different conditions, select the 'Condition' option to define the condition cases and the corresponding approvers.
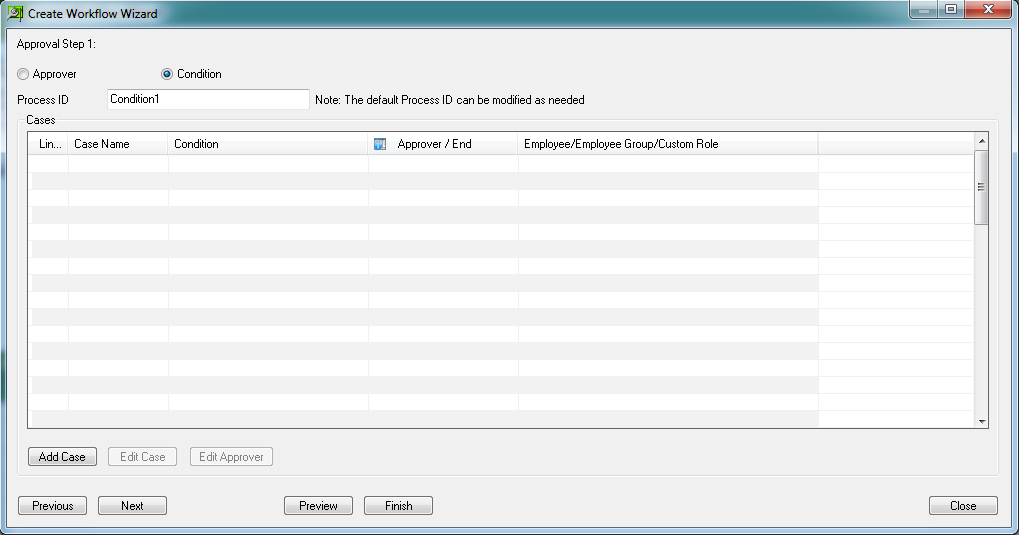
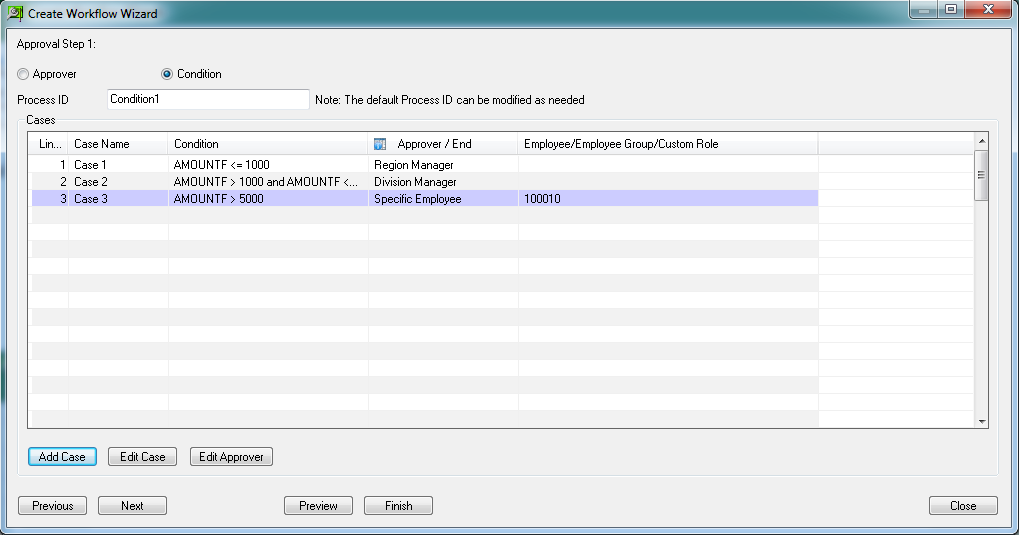
After clicking the 'Add Case' button on the form above, the following screen appears, allowing you to add a conditional case.
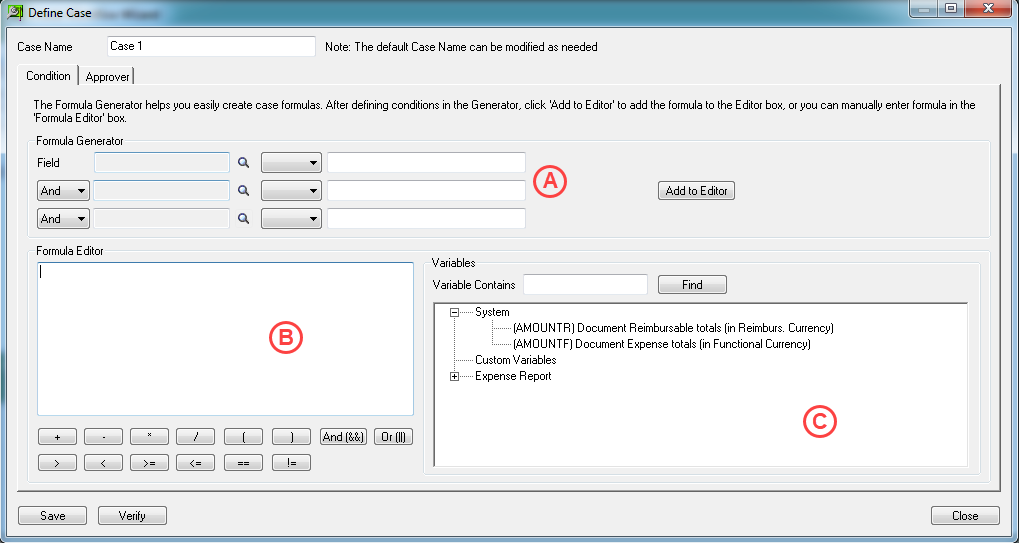
A condition case contains two parts: Condition and Approver
Add condition(s) for a case:
There are two ways to add a condition(formula):
Method 1 – Generate a formula with the 'Formula Generator'(area A).
Like the example in the above screen, select a field and an operator, enter a value, then click the 'Add to Editor' button to generate the formula AMOUNTF<= 1000 into the Formula Editor box(area B).
Method 2 – Enter a formula manually within the 'Fromula Editor'(area B).
Alternativately, you can manually enter a formula in area B.
To select a variable from area C, you should locate the variable first, then double click it to add to the area B.
After the condition formula is defined, go to the 'Approver' tab to specify an approver for the defined condition.
Add approver(s) for a case:
Go to 'Approver' page to assign an approver (or an approver group) for this condition.
Note: If you want to end the workflow under this condition, choose 'End'.
After a condition case is finished, click the 'Save' button in the above screen to add this case to the following screen:
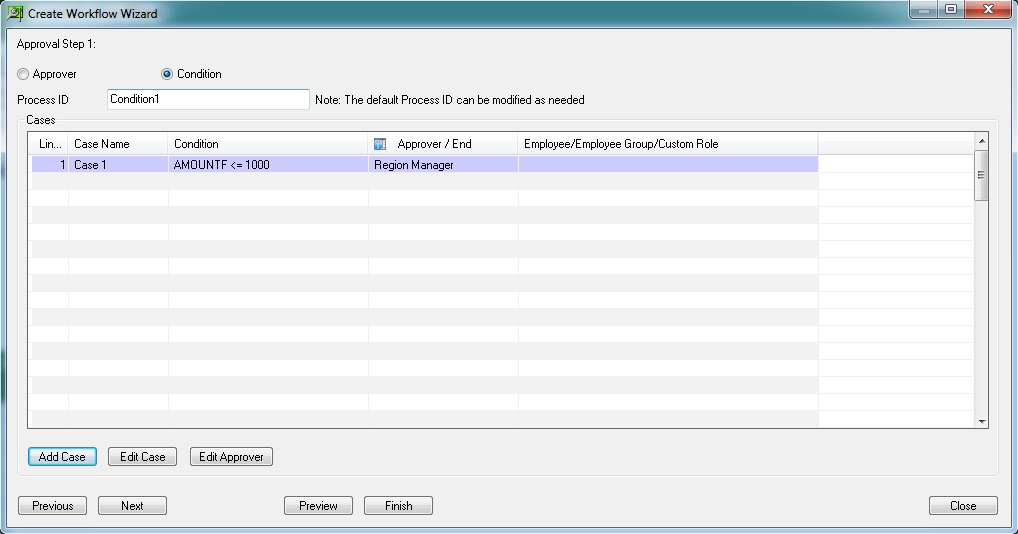
Add more cases as needed, then click the ‘Next’ button to define the next approval step.
Step 3 - Complete the approval workflow setup
Click the 'Finish' button to complete the workflow configuration.
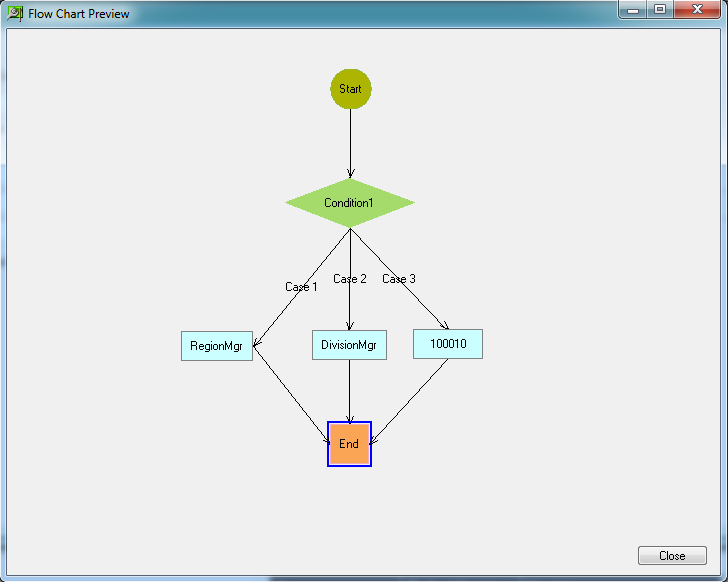
Note: you can click the 'Preview' button at any time to preview the workflow graphically.
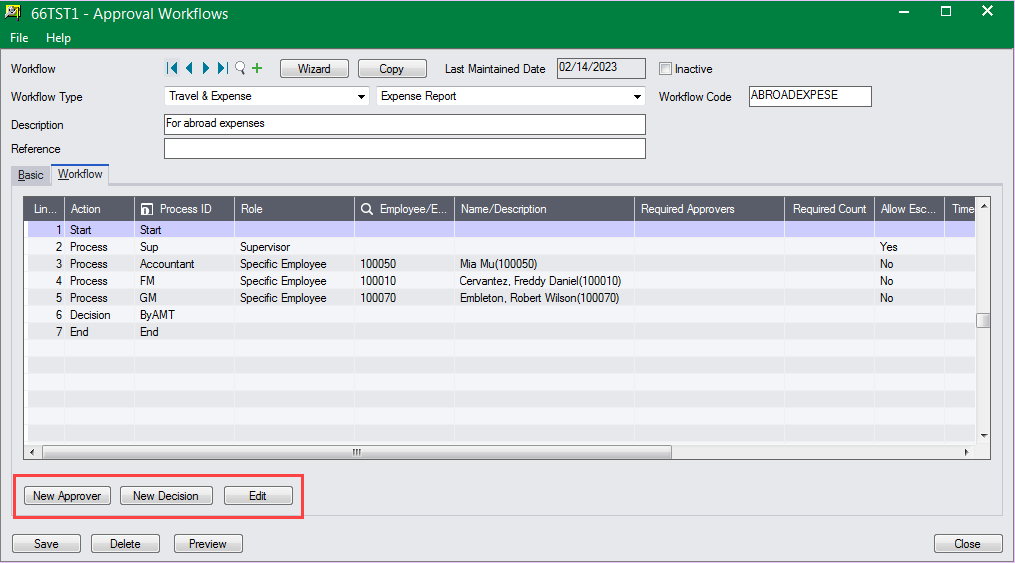
Besides the wizard introduced above, the following three buttons are added to the Workflow main screen to easily add/edit approvers and decisions.
Other Optimization
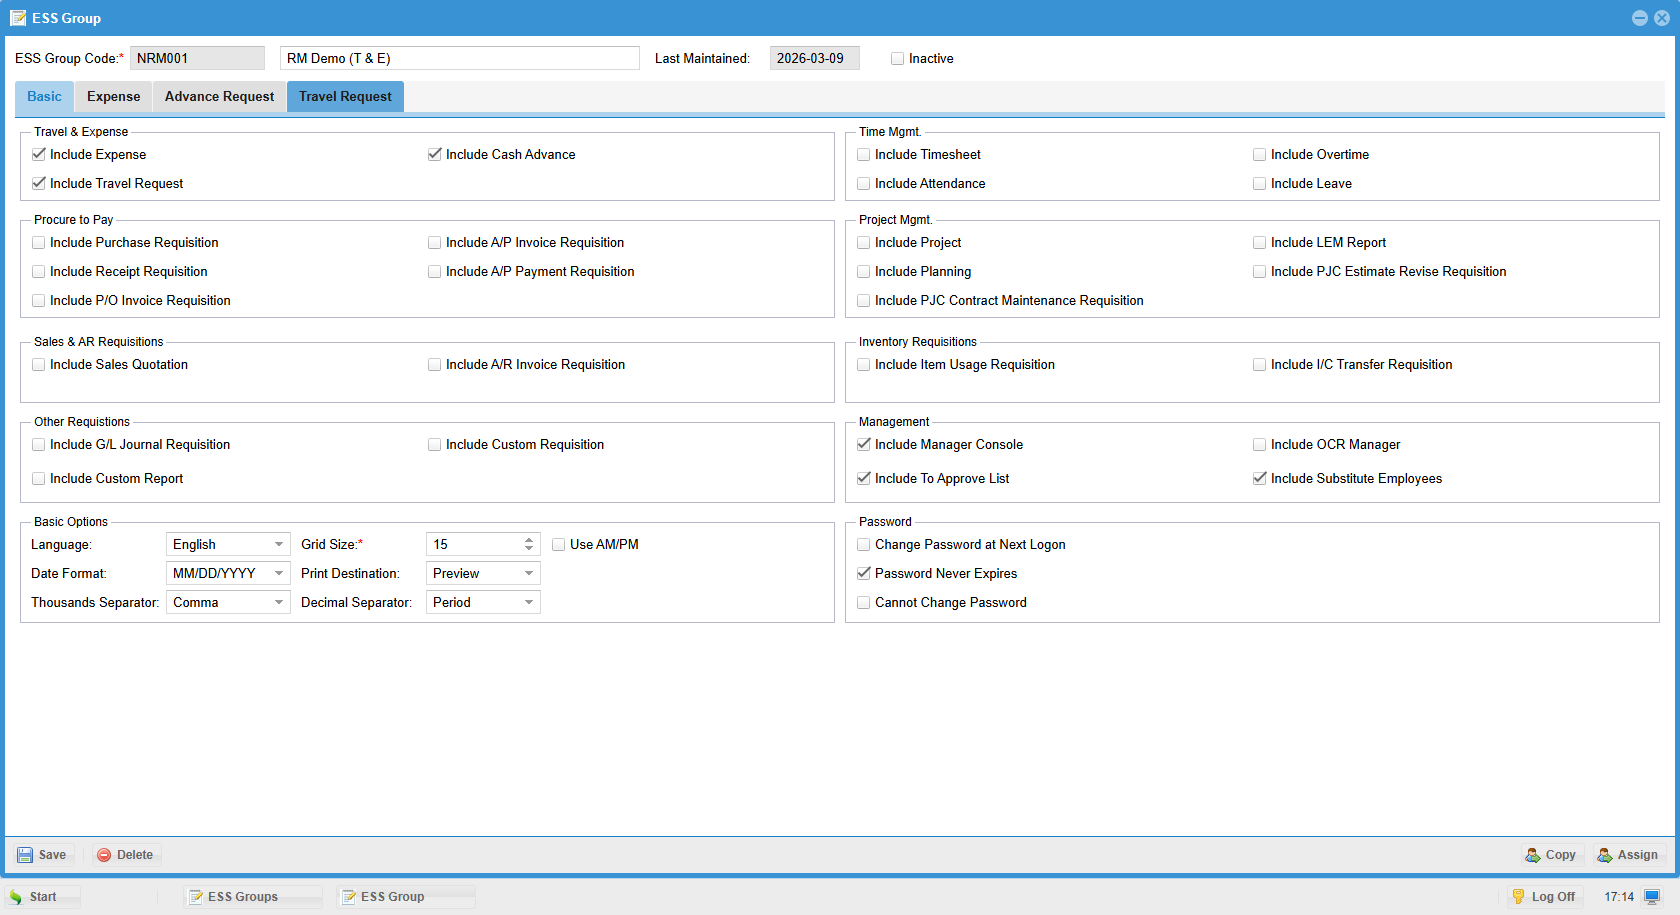
ESS Group
In previous versions, ESS Group is entity-relevant, which means you have to define at least one group for each entity, even if the settings are the same for all the entities.
The new version makes the ESS group independent of entities, thereby reducing the work of defining duplicate groups and improving efficiency.
ESS User
There are two improvements made in this version:
Improvement 1 - Improve the layout of the ESS User List
This new version simplifies the layout of the ESS User List by showing only one line for each user, while in previous versions, an ESS user might have multiple lines in the ESS User List if he/she has multiple accounts (across multiple entities).
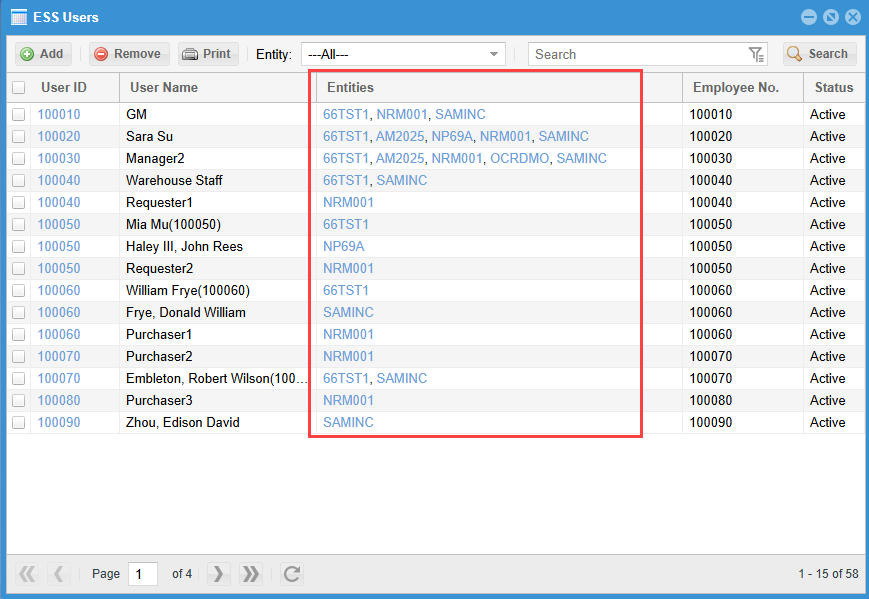
Note: The system identifies users by user ID and password. If both of the user ID and password are the same, then these accounts will be considered under the same user.
Improvement 2 - Make it easy to synchronize the changes from the current entity to other entities
The new version provides an easy way to synchronize the changes from a user account to the other accounts.
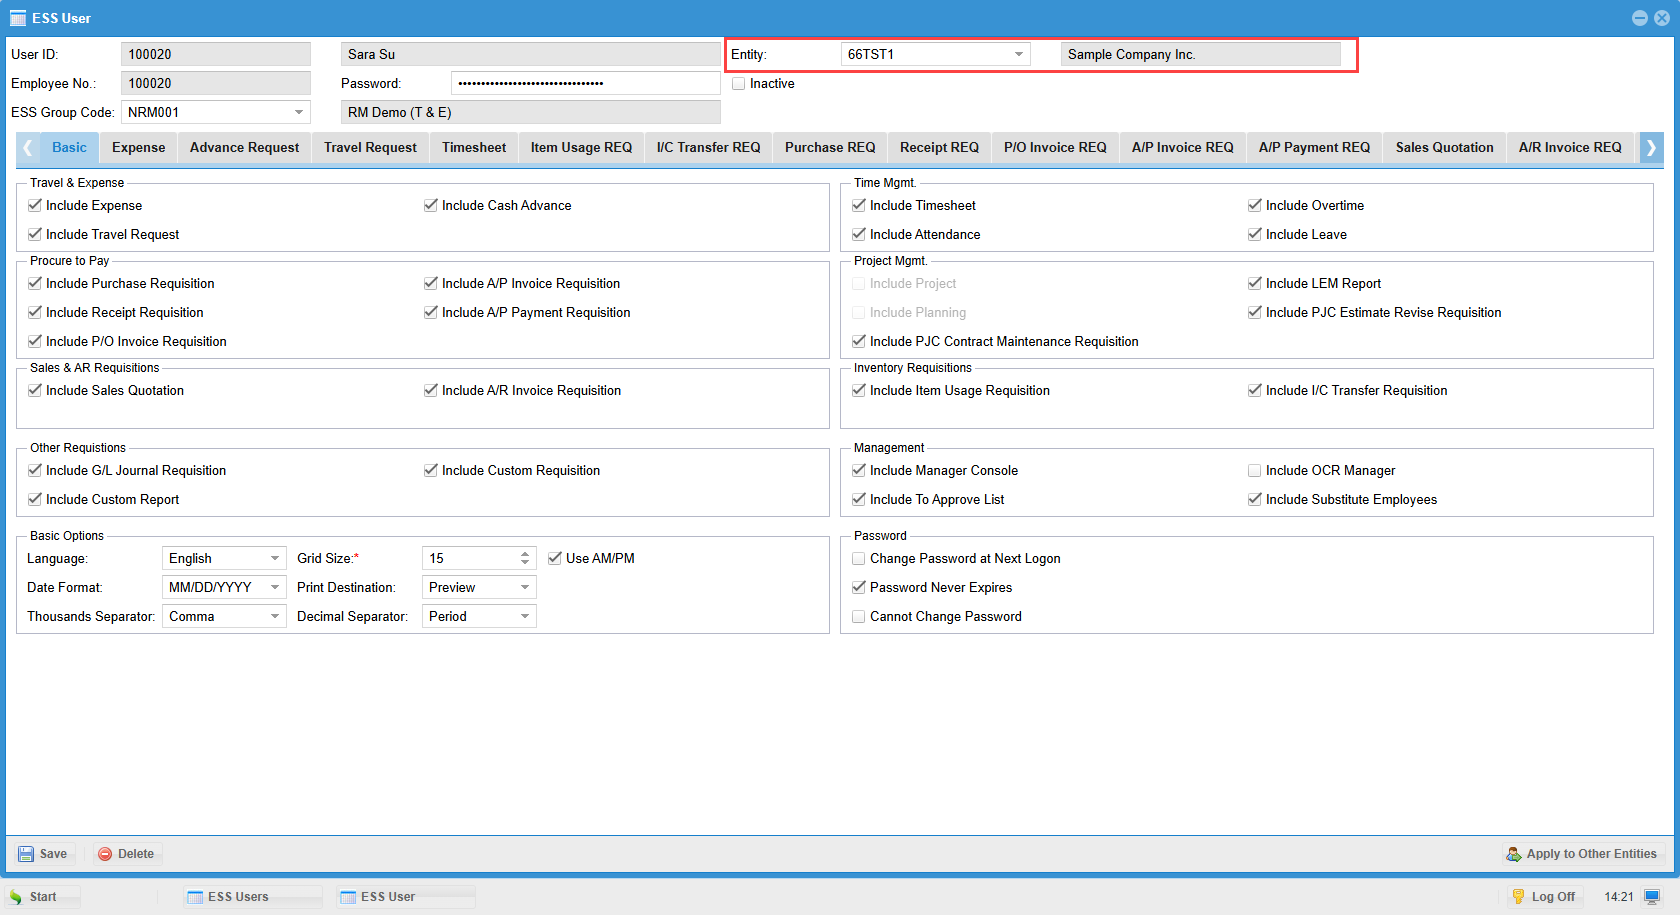
In the above ESS User screen, if you make some changes to the current entity's account, then click the 'Save' button, you will receive the following message.
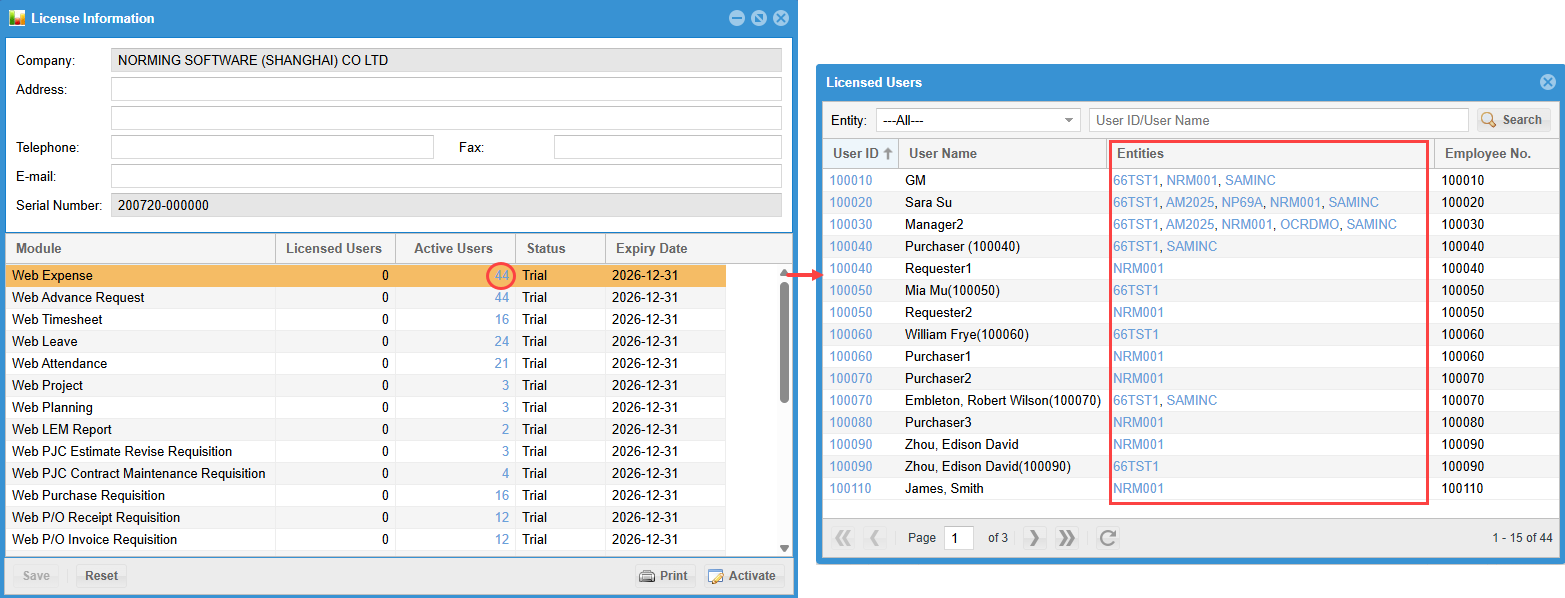
Licensed User
Improve the layout of the 'Licensed Users' list to only display one line for each user:
Entity
There are two improvements added to the Entity functionality.
Improvement 1 - Allow users to make an entity inactive.
ESS users are not allowed to log in an inactive entity.
This function is useful to disable the test accounts after testing process is completed in a test entity.
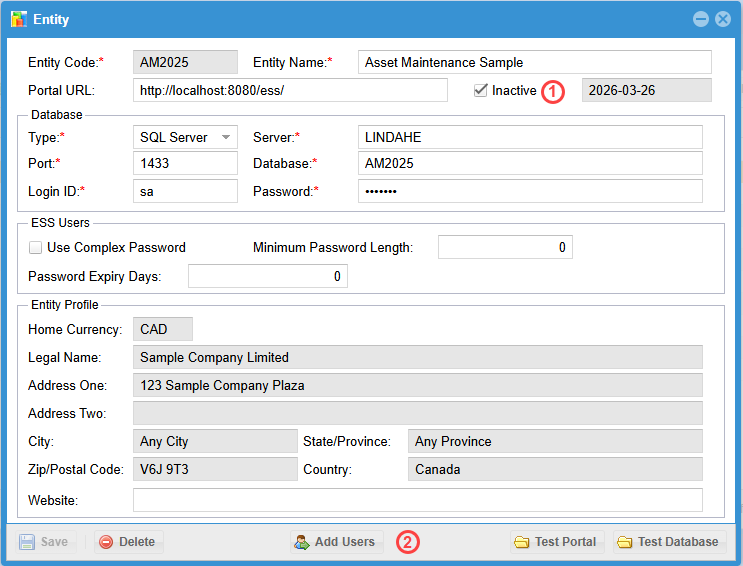
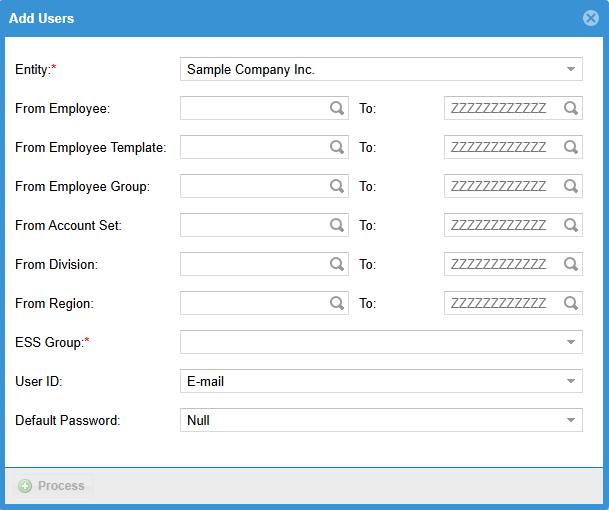
Improvement 2 - Allow to add ESS user accounts from within here.
After creating a new entity, you're able to click the 'Add Users' button in the bottom of the above screen to have the 'Add Users' screen at the left side, where to create ESS user accounts from employee records in the relevant Sage 300 company.
Previously, you have to go to the ESS User List to create new ESS accounts.
Part II - API
Purpose of APIs
All the customers are looking for a better integrated system to handle their daily operation to reduce duplicate work, improve data accuracy and work efficiency.
This new version provides APIs for the following transactions to make integration with other systems possible:
● Expense Report
● Timesheet
● Purchase Requisition
● PO Receipt Requisition
● PO Invoice Requisition
● AP Invoice Requisition
● Sales Quotation
Resource Manager’s APIs support two-way data synchronization:
- Push - Create R/M transactions from external system data.
- Pull - Retrieve R/M data and push to external systems.
Part III - New Features
Travel & Expense Suite
Travel Request
There are four improvements made to the Travel Request in this new version.
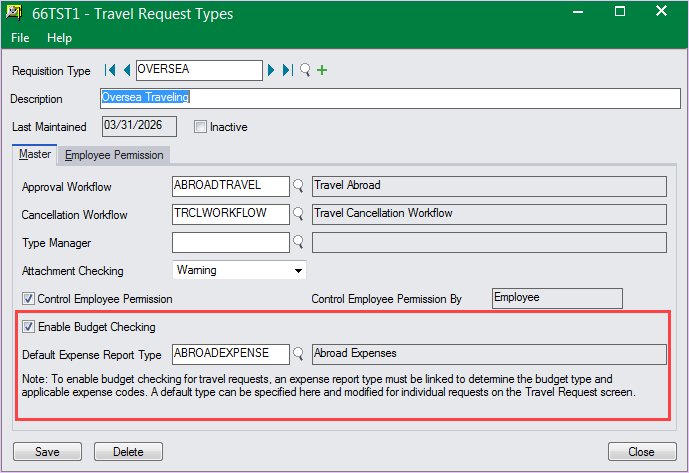
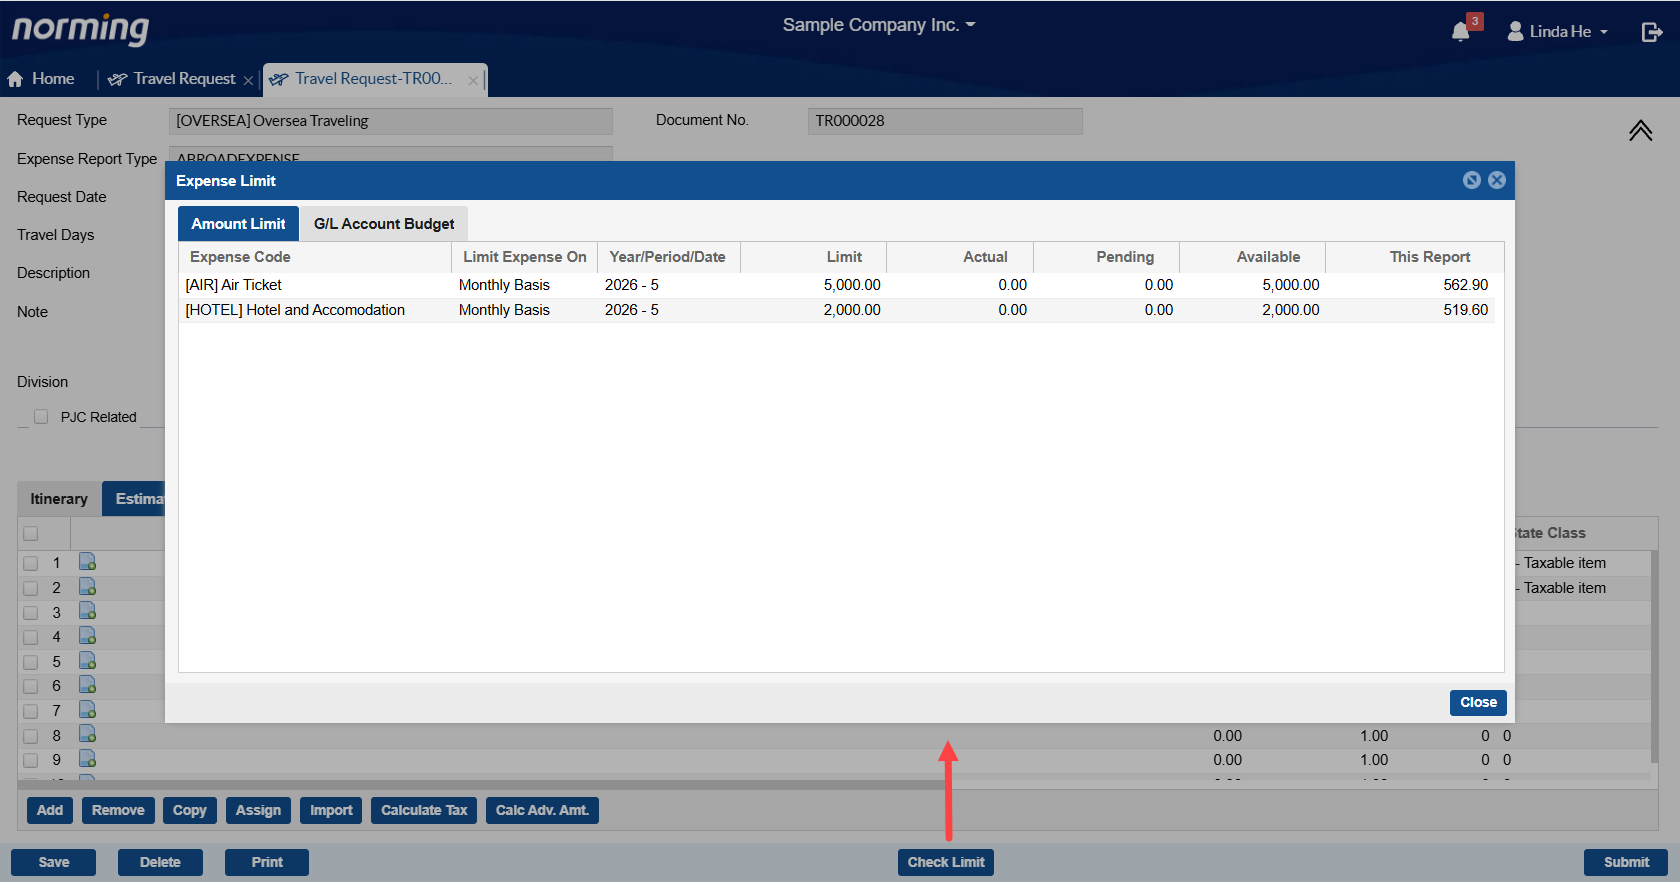
1. Provide budget checking capability against G/L Account Budget, PJC Estimate/Budget or Expense Limit.
In previous versions, budget control capability is provided at the expense claiming stage. Some companies want to keep expenses controled before them incurring, then this new feature helps.
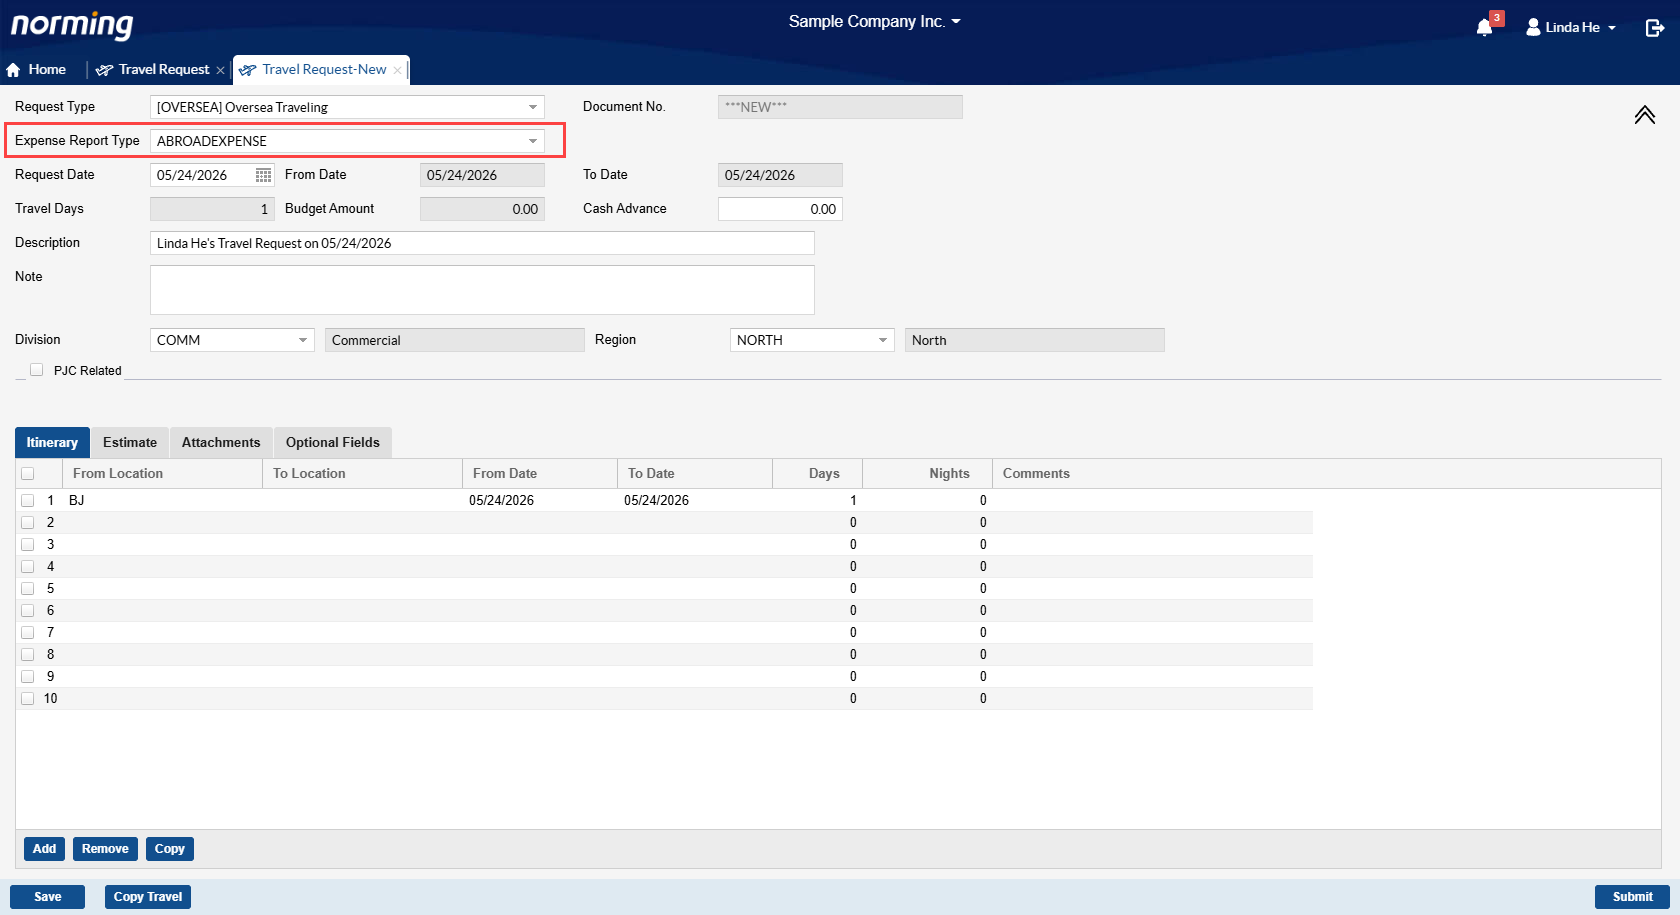
To enable this feature, select the 'Enable Budget Checking' option, and specify a default expense report type. This defaut report type can be changed for each travel request, and based on the settings in expense report type, the system performs budget checking.
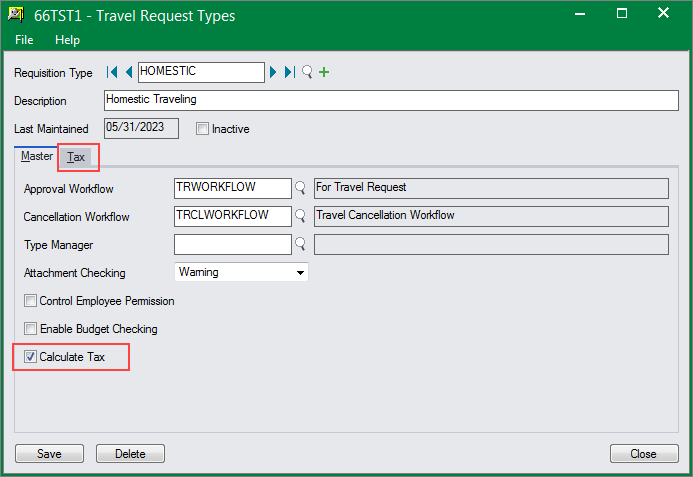
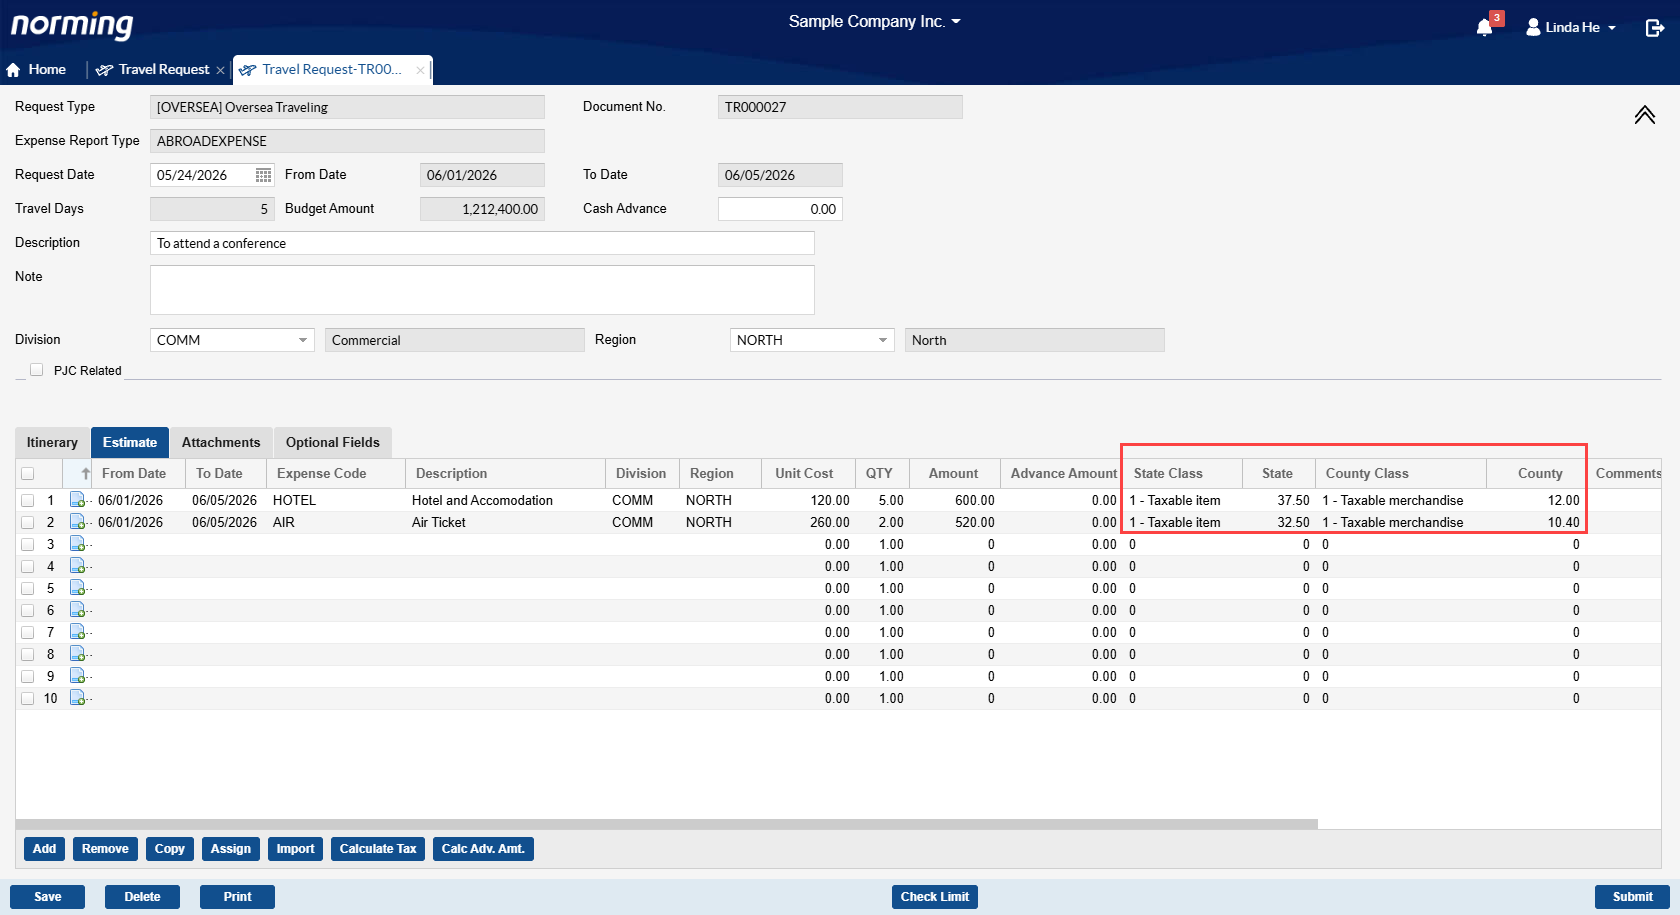
2. Tax can be calculated for estimated expenses.
Select the 'Calculate Tax' option if you want to calculate tax for the expense estimate in travel request.
Note:
If budget checking capability is enabled for a travel request type, the 'Calculate Tax' option will be hidden. Under this case, the tax related settings will follow the ones defined in the selected expense export type.
3. Display 'Claimed Amount' and 'Outstanding Amount' columns at estimated expense level in Travel Request.
Claimed Amount displays the expense amount claimed in related expense reports (submitted, approved or posted).
Outstanding Amount = Estimated Amount – Claimed Amount
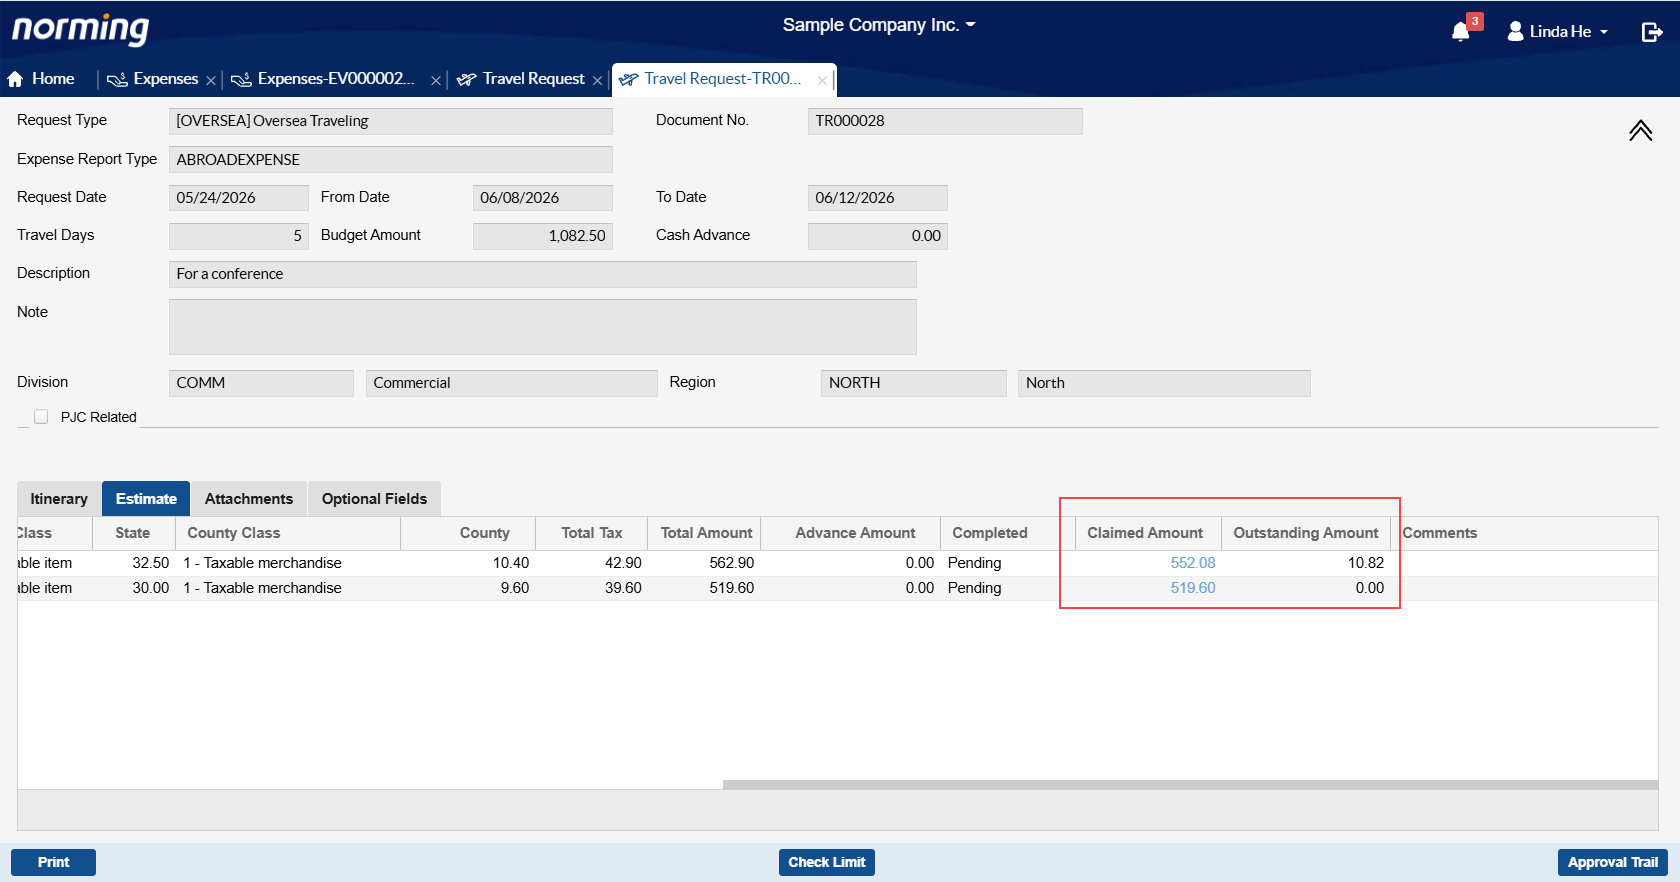
Click the link on the Claimed Amount to list where this particular expense has been claimed.
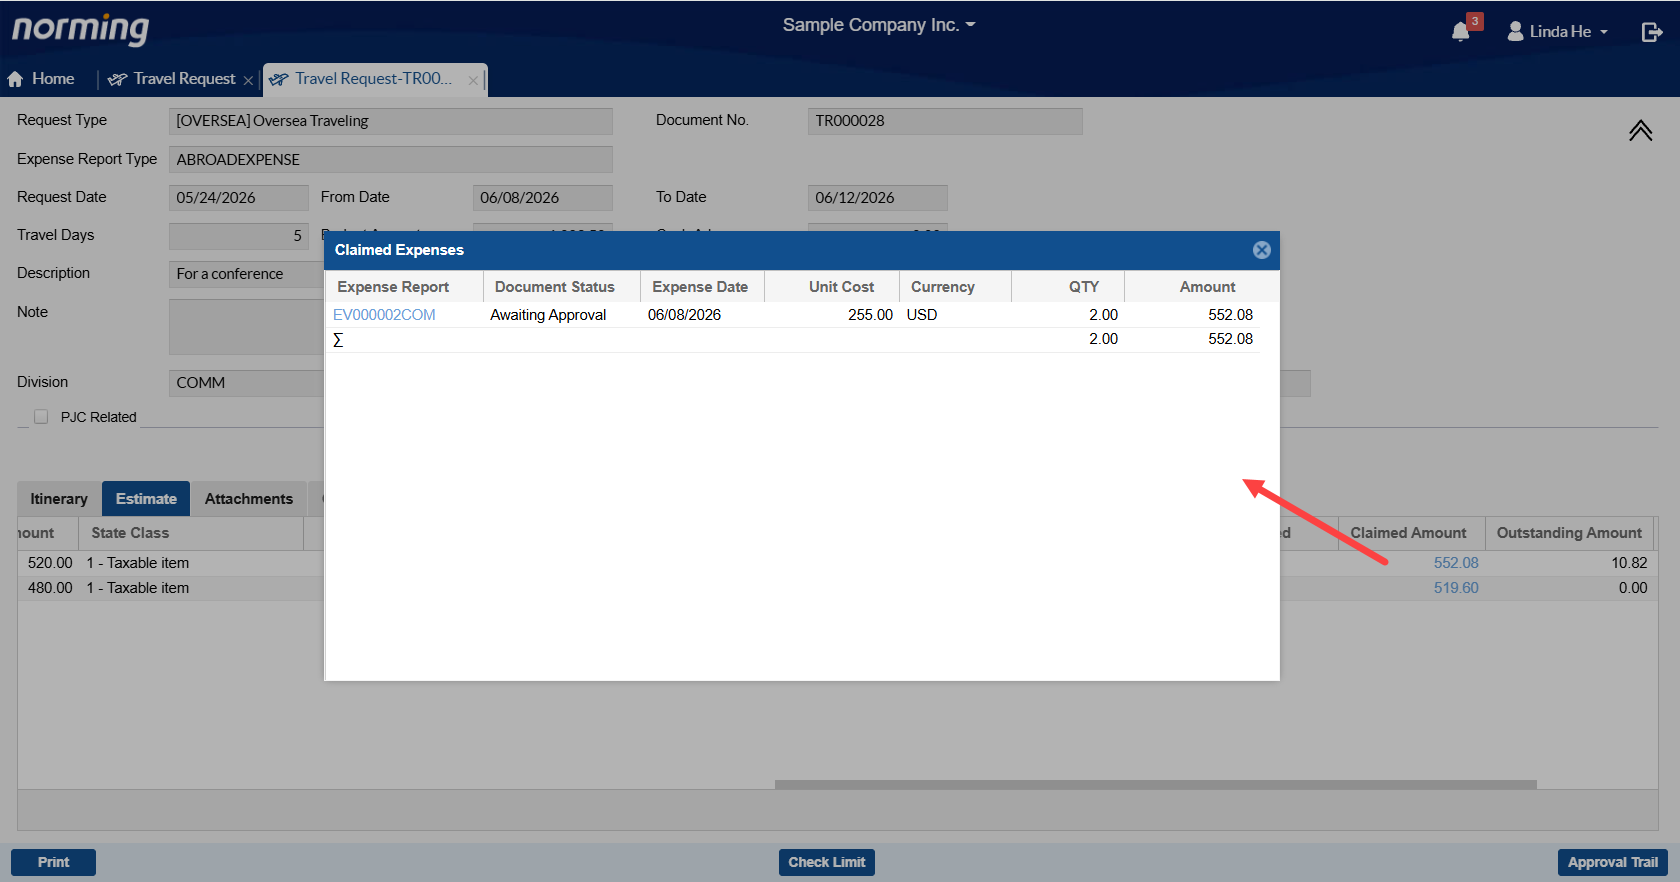
A link is also provided for the 'Expense Report' column to open the related expense report.
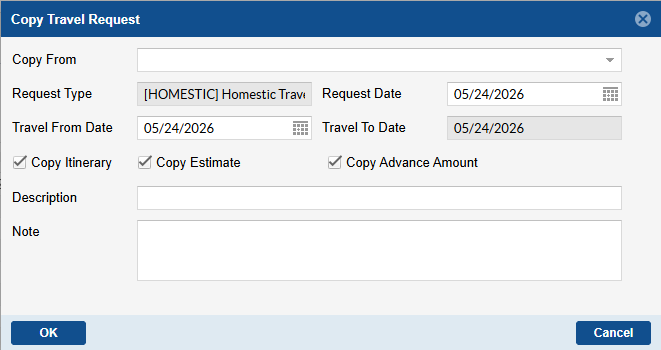
4. Provide the 'Copy Travel Request' function.
If you have some regular travel plans, this new feature will be very helpful.
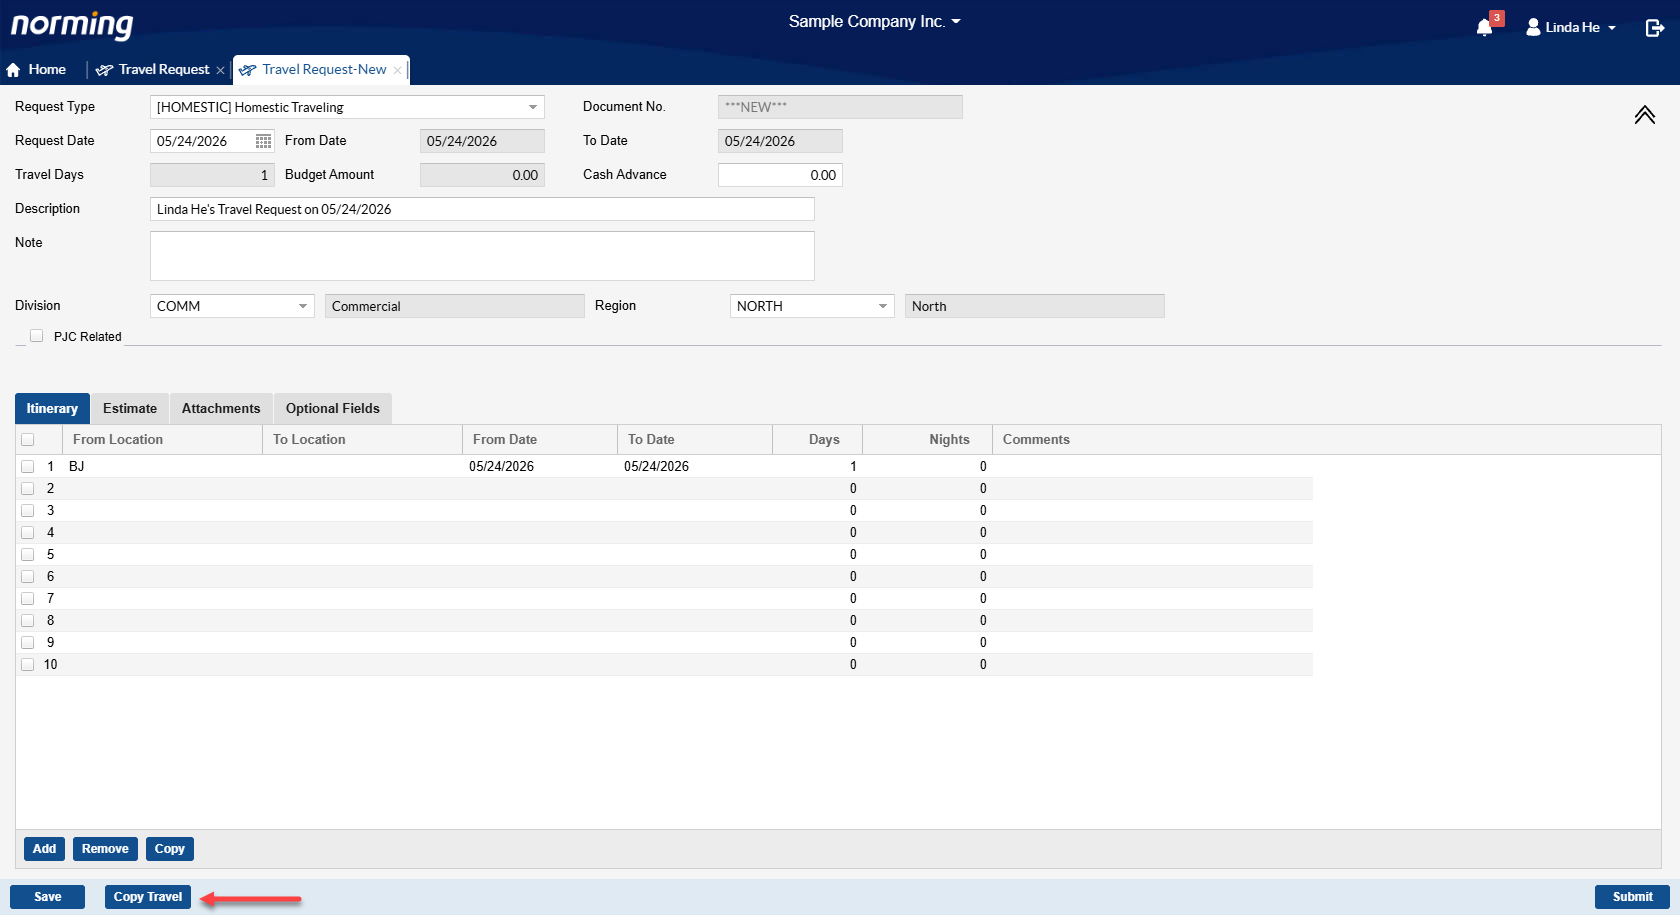
Select a travel request to copy from, specify the Request Date, Travel from Date, decide whether to copy itinerary, estimate and advance amount, enter Description and Note, then click the 'OK' button. The system will automatically generate a new travel request accordingly.
Expense Report
There are several improvements made to the Expense Report in this new version.
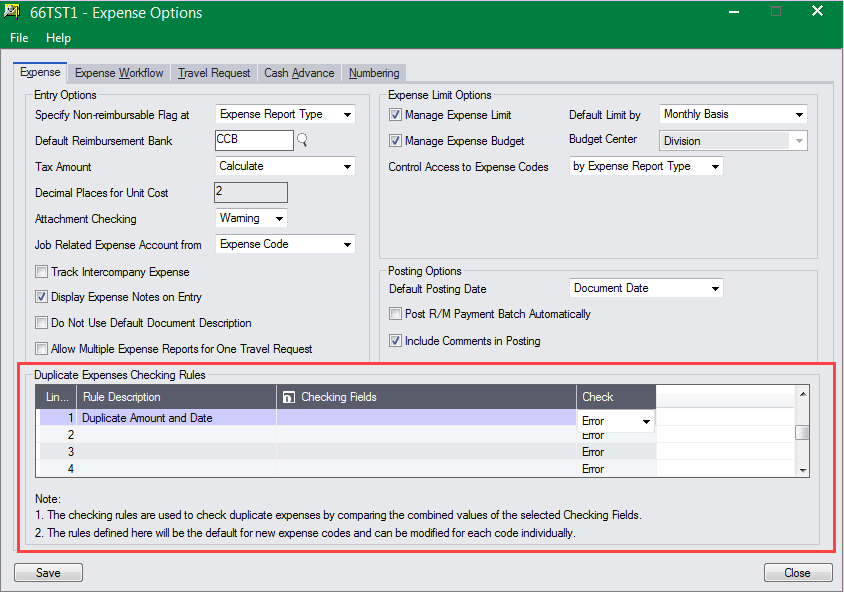
1. Provide the capability to validate duplicate expenses across the whole entity.
In the Expense Options, you can define default checking rules and assign them to existing expense codes.
① Give a rule description, then click the  button in the above screen to load the following form to define the checking rules.
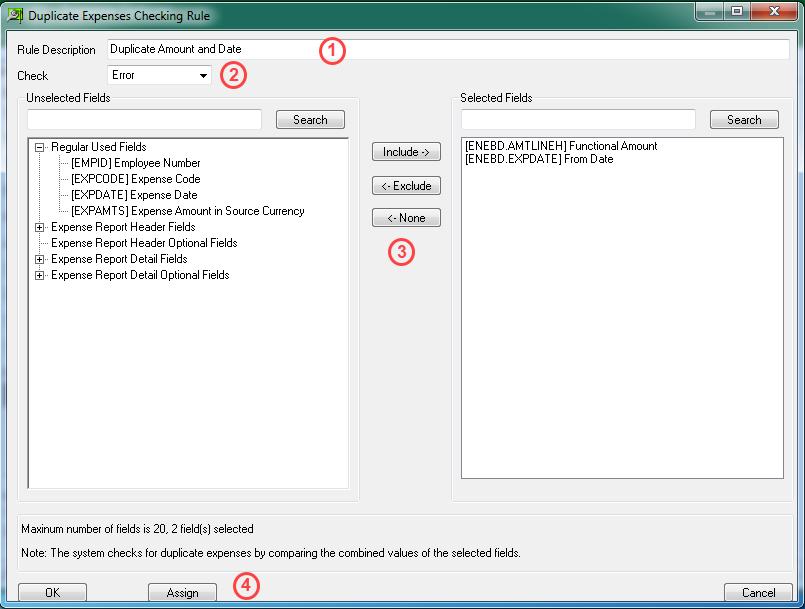
② Select 'Error' or 'Warning' for the 'Check' option.
- 'Error' stops users from saving a duplicate expense.
- 'Warning' just prompts a warning message.
③ Select the fields to be validated from the left box to the right box.
④ Click 'Assign' button to assign the new rule to existing expense codes if required.
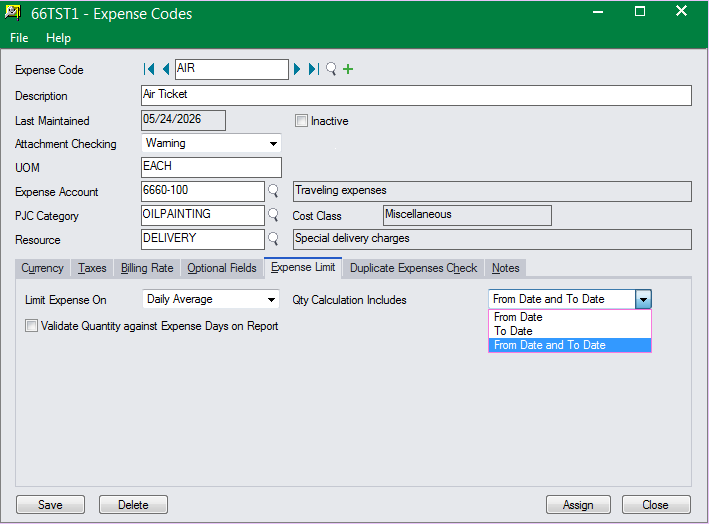
2. Provide one more method to check expense limit - Check by Daily Average Limit.
The previous versions provide four methods to validate expense limit: Monthly Basis, Yearly Basis, Year to Date Basis and Daily Basis.
This version provides one more method - Daily Average, which validates expense limit as follows:
If the daily limit on expense A is $50, now you claim expense A from 5th to 8th June 2026.
● Under method of ‘Daily Basis’
The expense A that is claimed on every single day (within this date range) cannot be greater than $50.
● Under method of ‘Daily Average’
If the total expense divided by the number of days in this date range does not exceed $50, then the validation gets passed.
To enable this new feature, select the Use 'Daily Average' Limit option in Expense Options to enable this method.

Decide which expenses will be validated with this method:
Note:
From/To Expense Date must be specified for an expense which is configured to be validated under this method.
3. Provides attachment checking capability at expense level.
This version allows you to force or warn to upload attachments for some particular expenses.

4. Display a summary line at the bottom of the Travel Budget table.

Advance Request
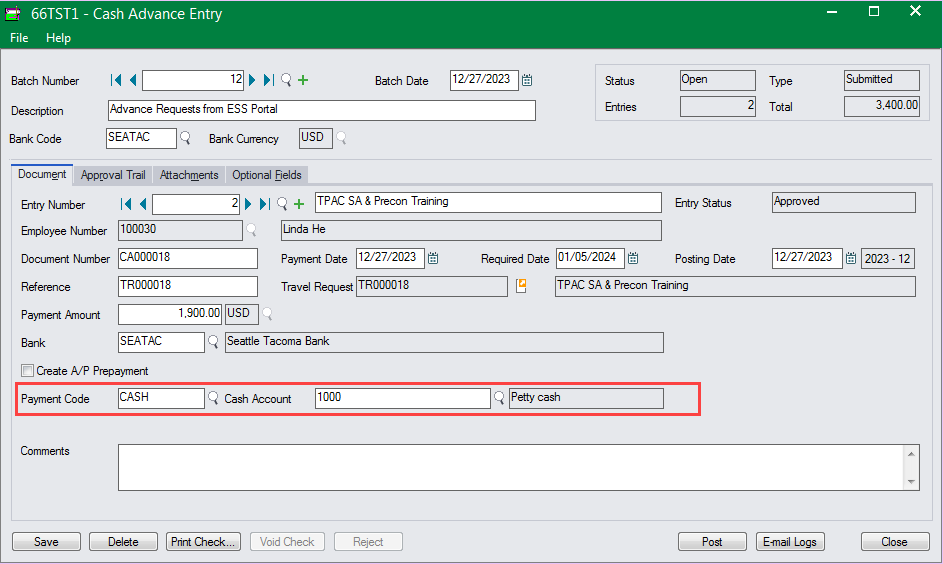
1. Provide the 'Payment Code' setup code in Travel & Expense > Setup menu to define payment codes, which can be used in Cash Advance or Payment Entry to specify the way to pay employees.
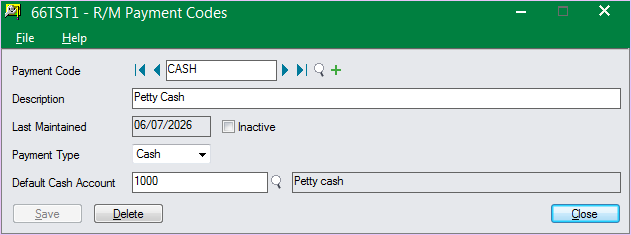
Note:
A default payment code can be specified in Employee Register > Default page.
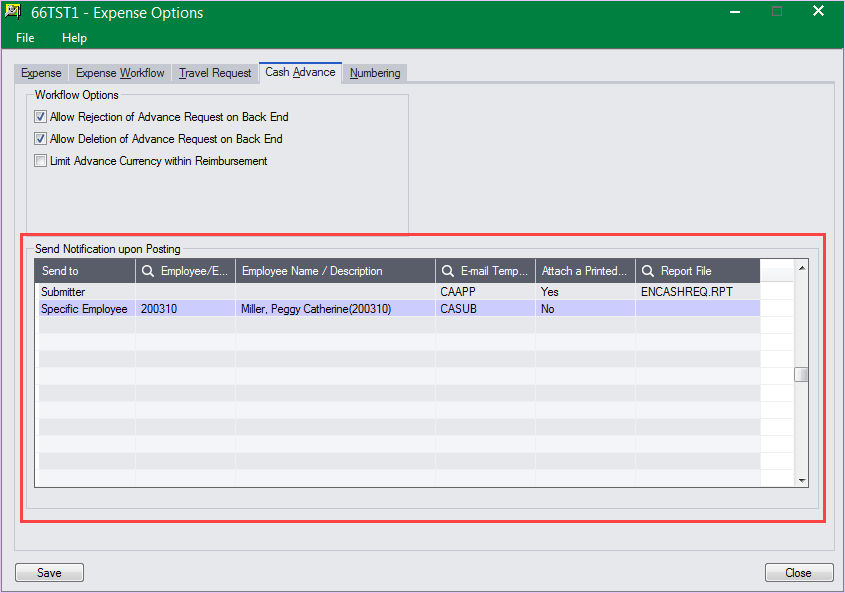
2. Provide the capability to send email notification to specified users during posting process.
Go to Expense Options > Cash Advance page to enable this feature.
Steps:
Insert a new line > select which user to send notification to > specify an E-mail template > decide whether to attach a report in the notification.
Procure to Pay Suite
Purchase Requisition
1. Improves the online RFQ function to allow vendors to enter discount.
Set up the ESS Group to display the three discount-related fields.
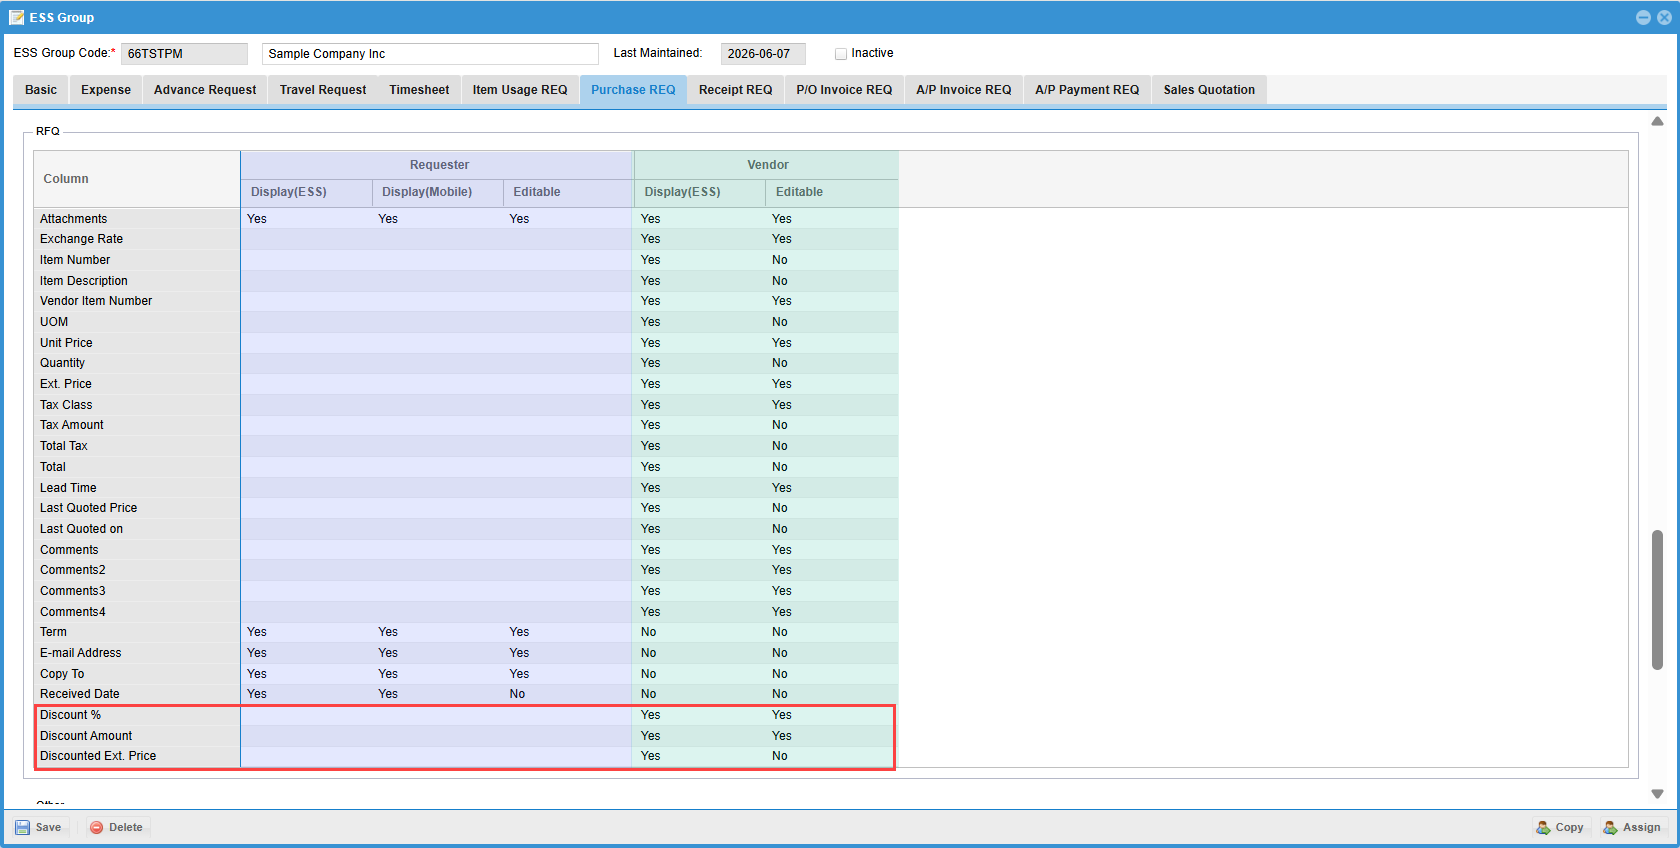
With the above setting, the three discount related fields will be available in the Request for Quotation screen for vendors to provide discount information.

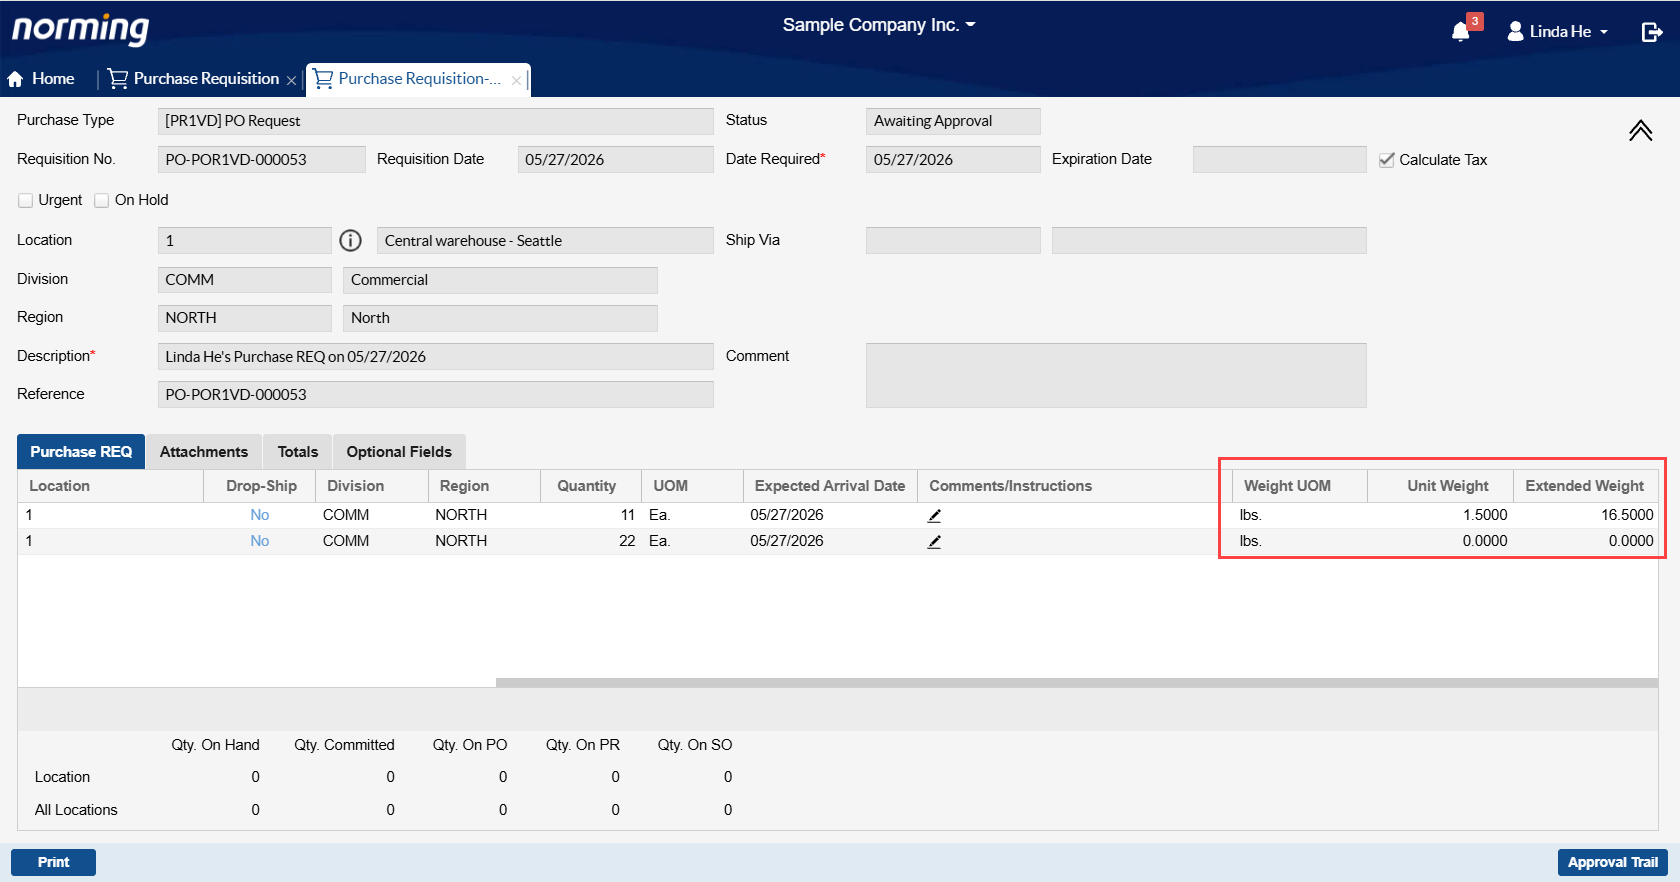
2. Three Weight related columns can be maintained or viewed in ESS per settings in ESS User profile.
3. Multiple report formats for Purchase Requisition are supported in the ESS Portal.
Select the below option in Purchase Types to enable this feature.

Select default reports for requestor and approver respectively. The reports selected here will be automatically uploaded into the Web Server where the ESS Portal is installed.
Notes:
● Only the default reports defined in purchase types can be copied to the Web ESS server automatically, while the other report formats that might be used in the ESS Portal must be manually copied to the following folder in the ESS Server: [Norming Tomcat]\webapps\ess\customization\report\ENG\[[Entity ID]\PRReport
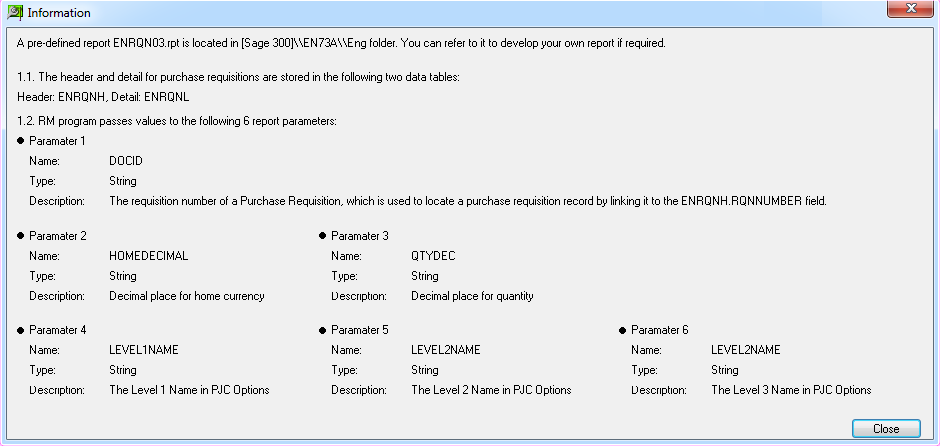
● Click the question mark(?) next to the finder of the report field to display the following information screen, which explains the parameters that the ESS Portal can pass to the reports printed through the ESS > Purchase Requisition.
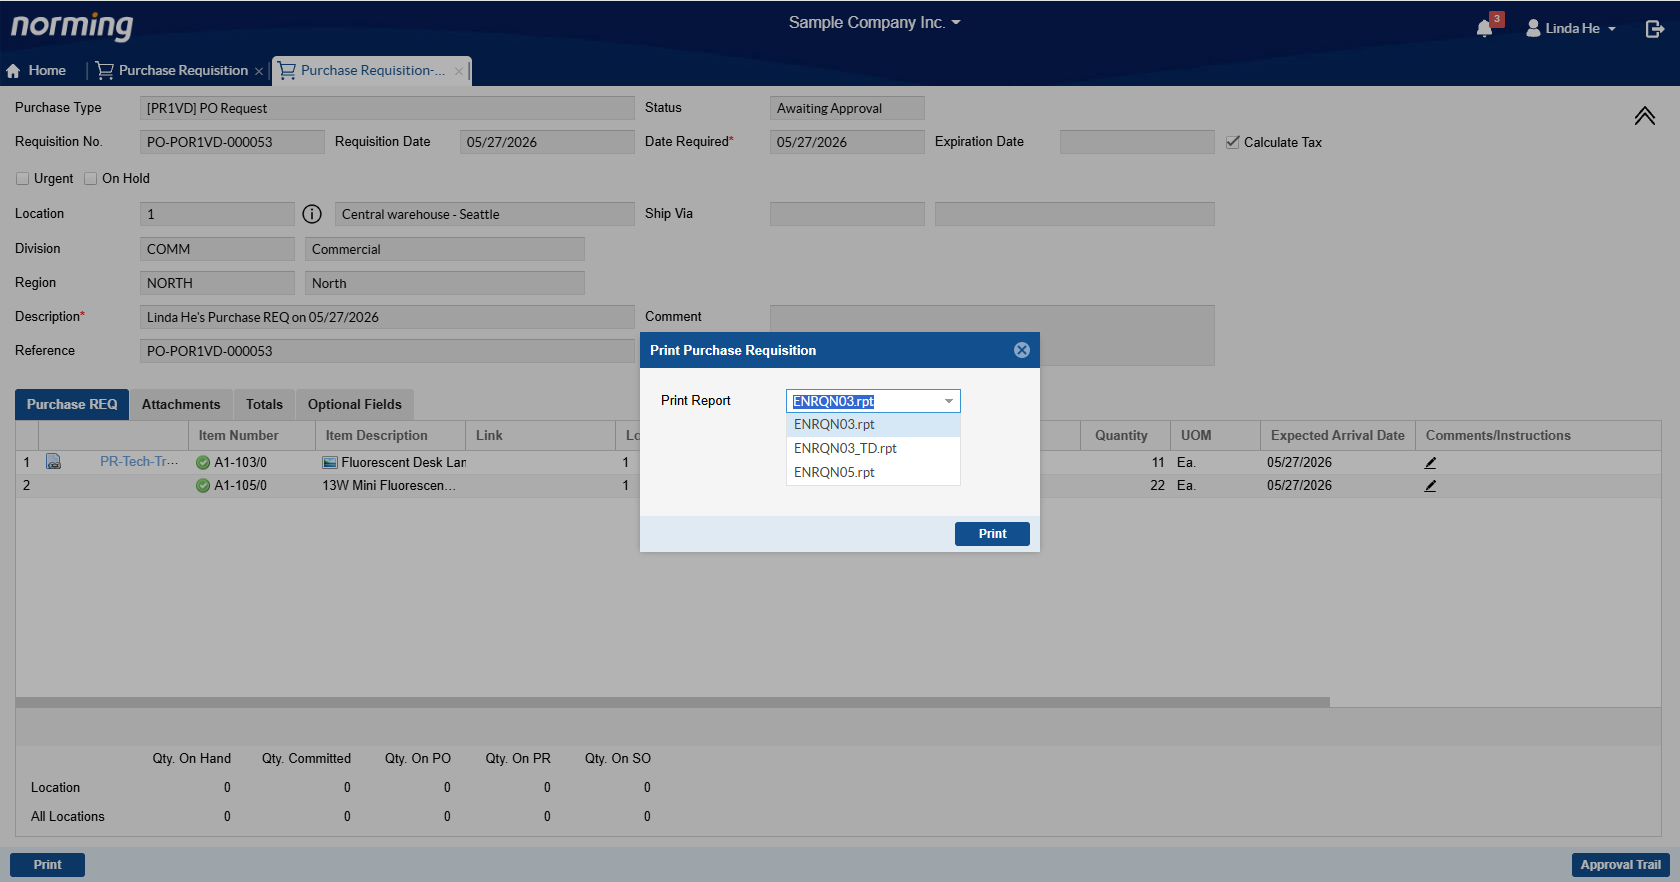
If the 'Allow Multiple Report Formats in ESS Portal' option is selected, when you click the 'Print' button in ESS Portal > Purchase Requisition screen, the following form pops up for you to select a report format to print from.
The default report specified in the purchase type will be the default format, but you can click the list to choose another format to print with.
4. Improve the Budget screen to only display the records that approvers have permission to access.
For example, there are 4 details in a purchase requisition, but approver A can only view two of them. With the improvement, approver A can only view the budget information for those two details. While in previous versions, approver A can view the budget information for all the details.
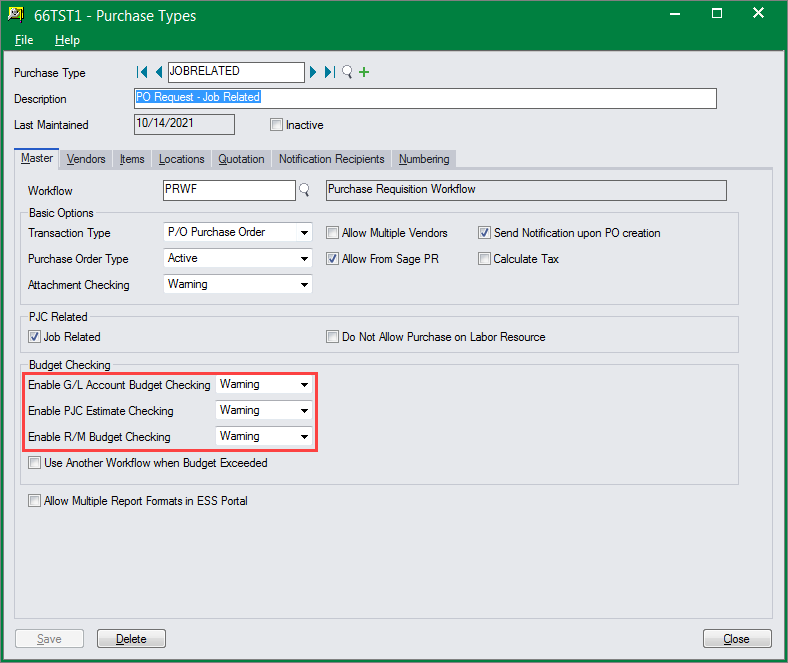
5. Improve the system to allow enabling all the three types of budget checking functions (G/L Account Budget Checking, PJC Estimate/Budget Checking or R/M Budget Checking) at the same time.
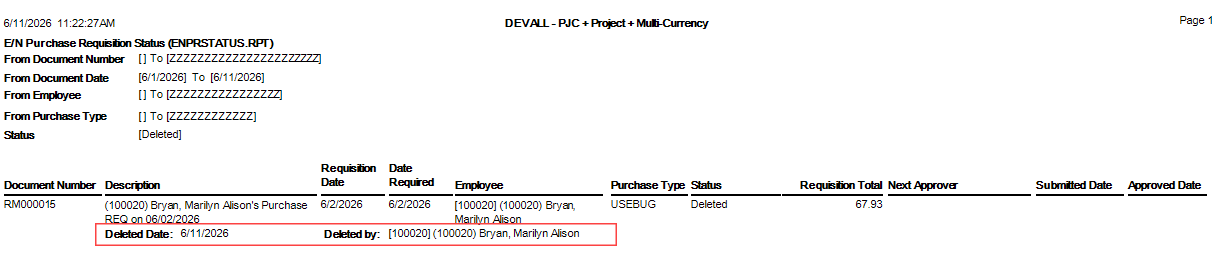
6. When purchase requisitions are virtually deleted, the system maintains the 'Deleted by' and 'Deleted Date' fields for audit tracking purpose.
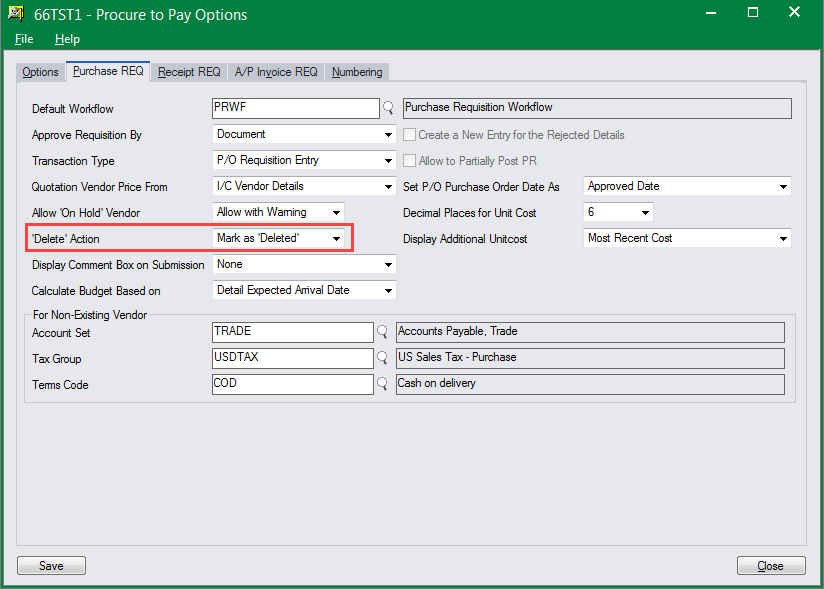
The two new added fields can be viewed from within the 'Purchase Requisition Status' report:
7. Improve the Finder for ‘PJC Contract’ in the following two aspects:
● Display more columns, Customer, Manager, Account Set, Start Date and Comment.
● Provide the fuzzy search capability.
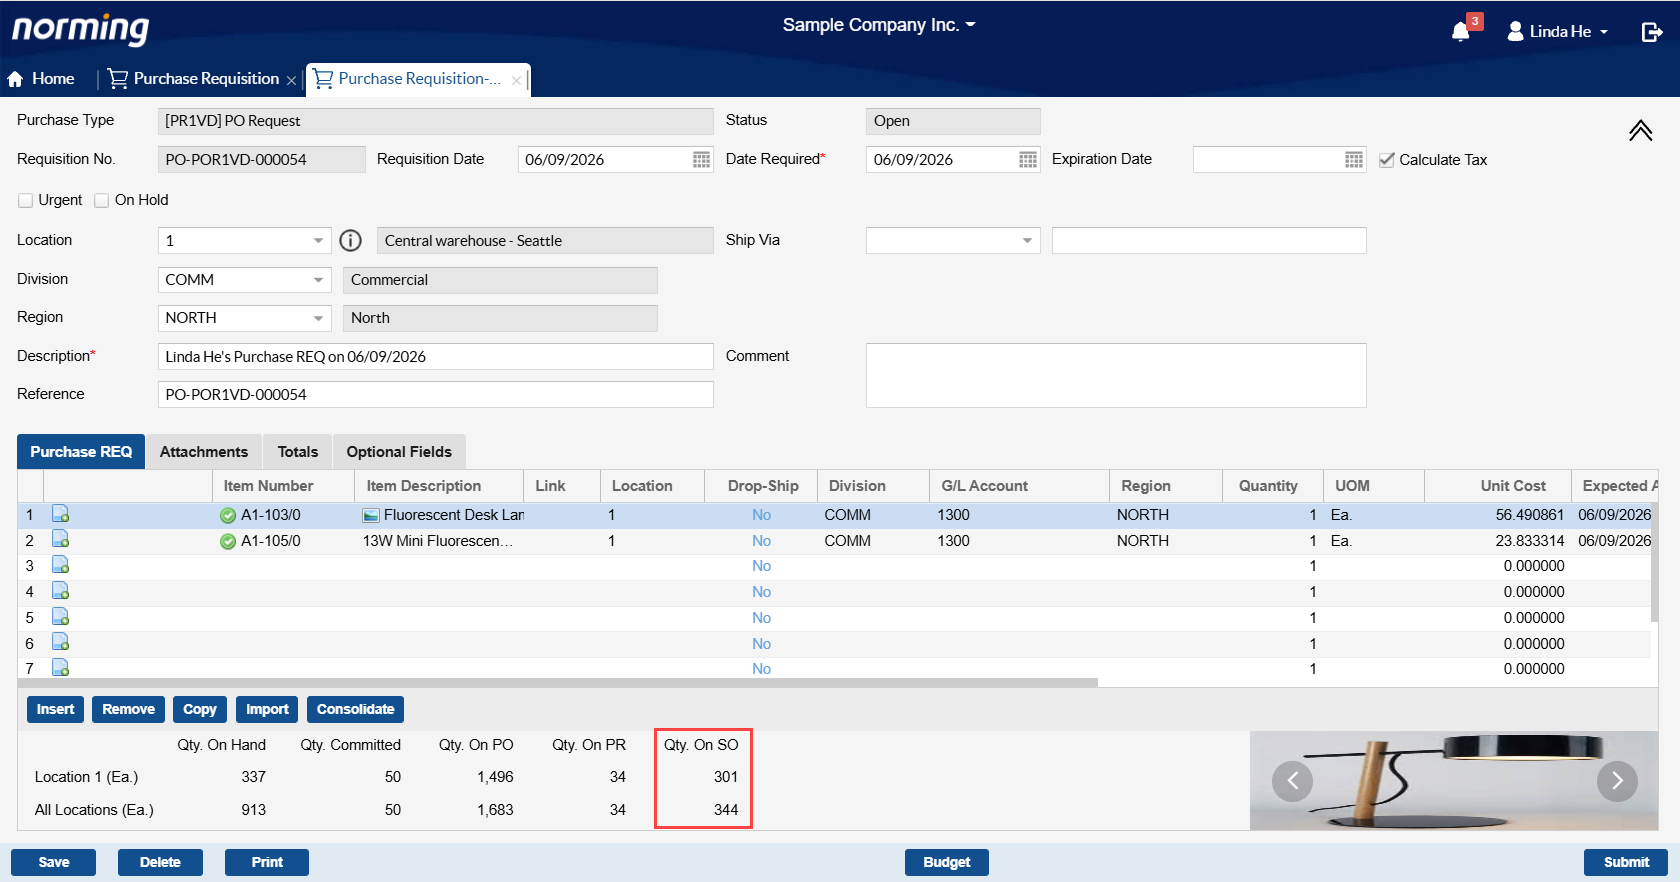
8. Provide the 'Qty on SO' column in the Location Detail area.
P/O Invoice Requisition
1. Improve the Finder for Receipt Number by displaying one more column - 'Total'.
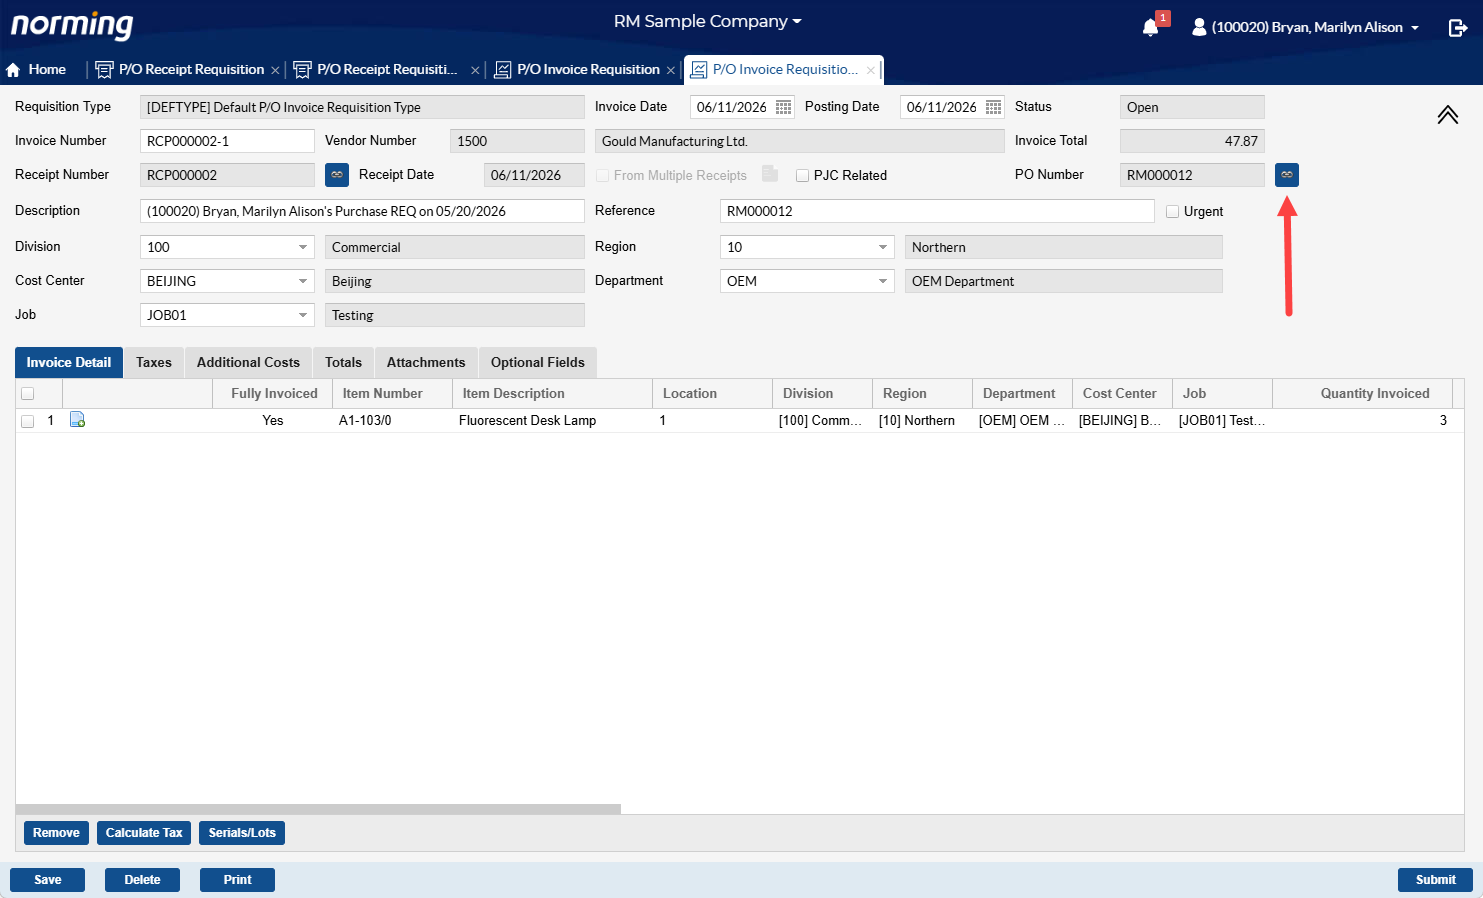
2. Provide a link button next to the PO Number field to drill down to the relevant Web Purchase Requisition.
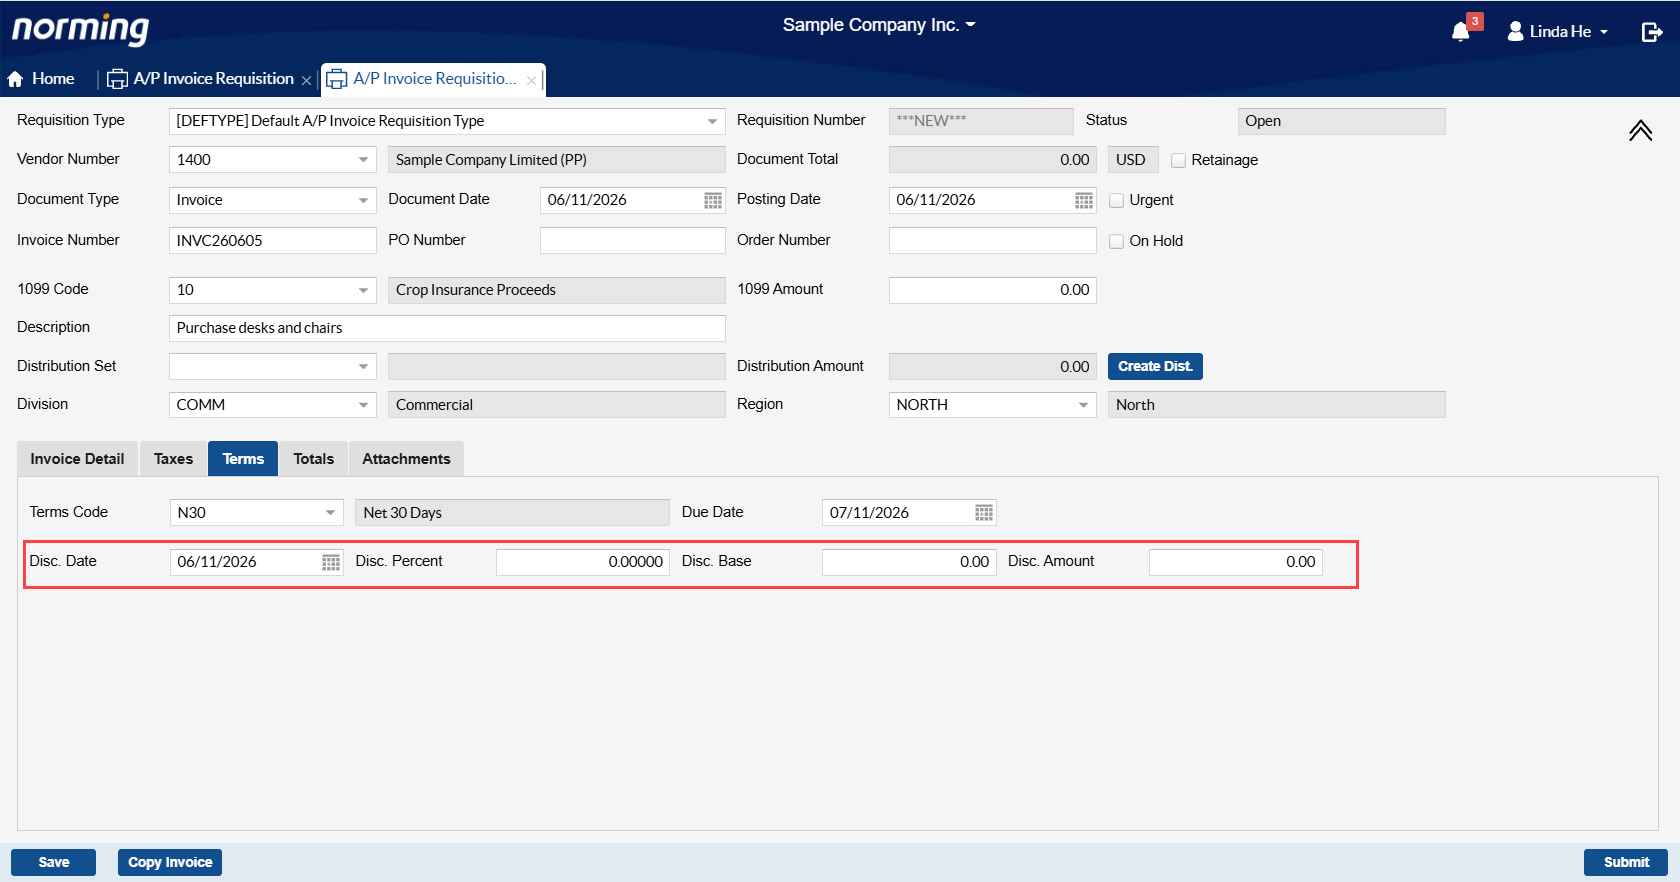
A/P Invoice Requisition
1. Discount can be maintained in A/P Invoice Requisition
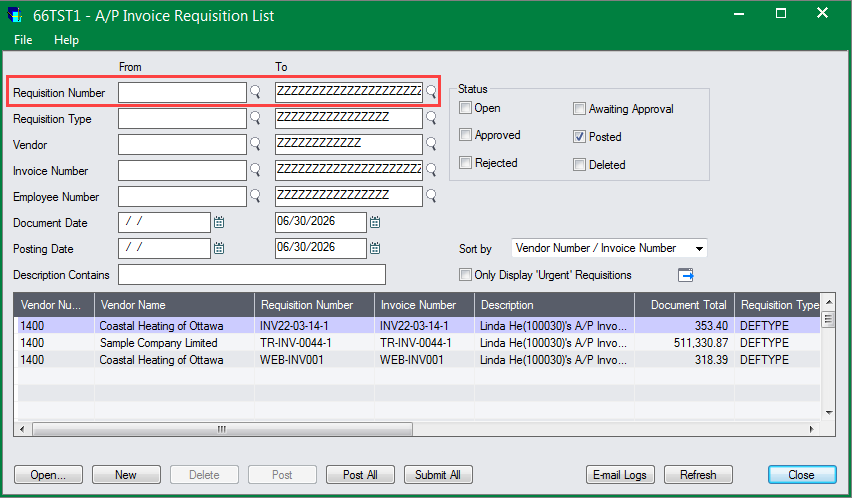
2. Provide the capability to filter AP invoice requisitions by Requisition Number range at the Back-End Application.
A/P Payment Requisition
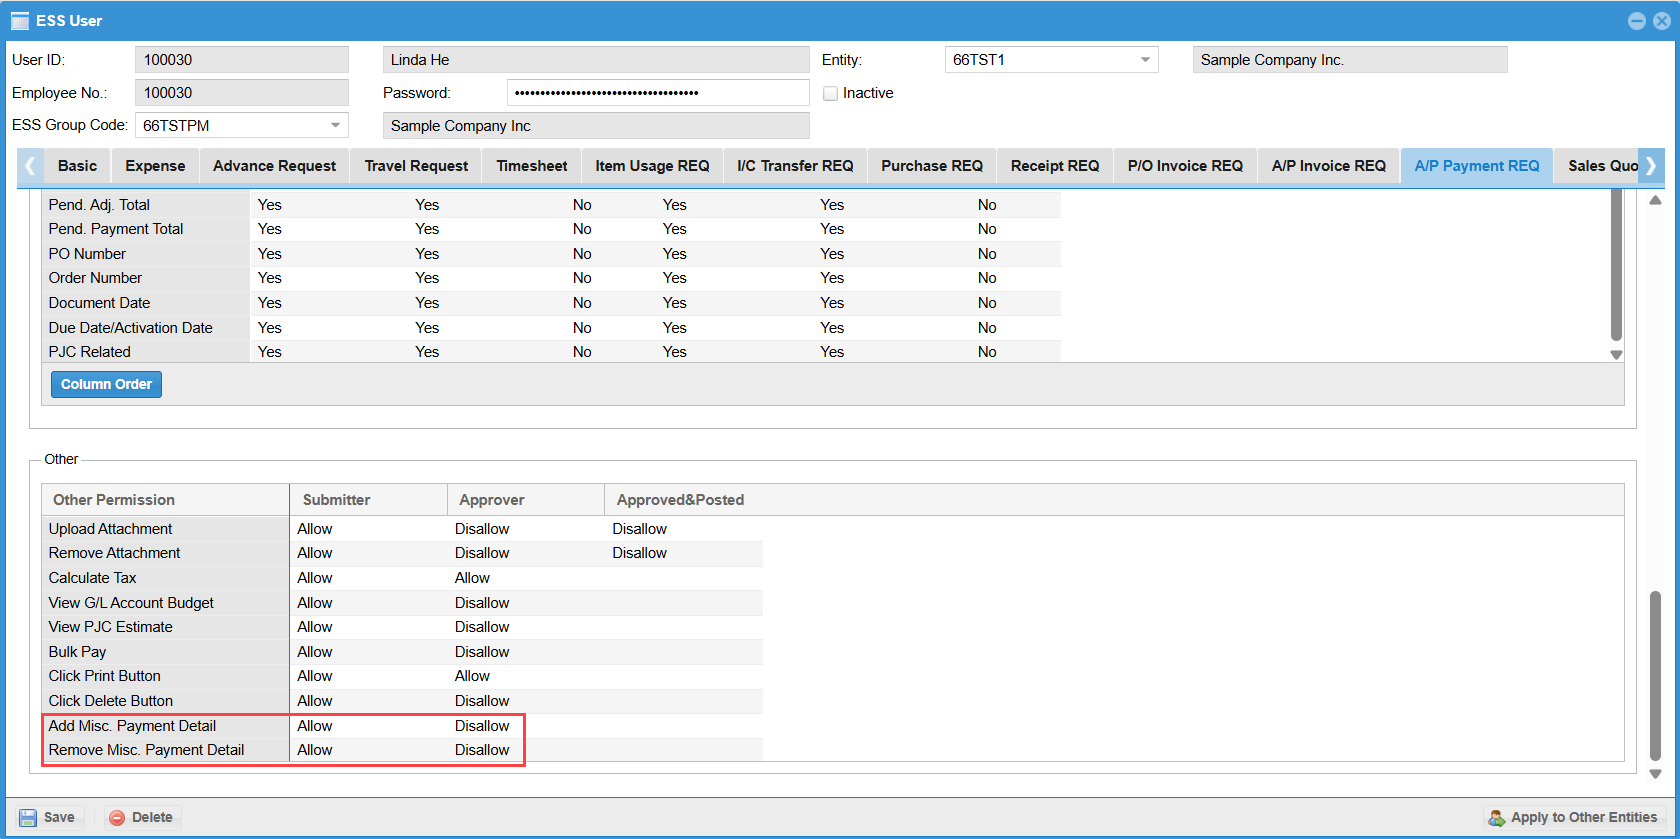
1. Provide the permission control on adding and removing details for Misc. Payment Requisition.
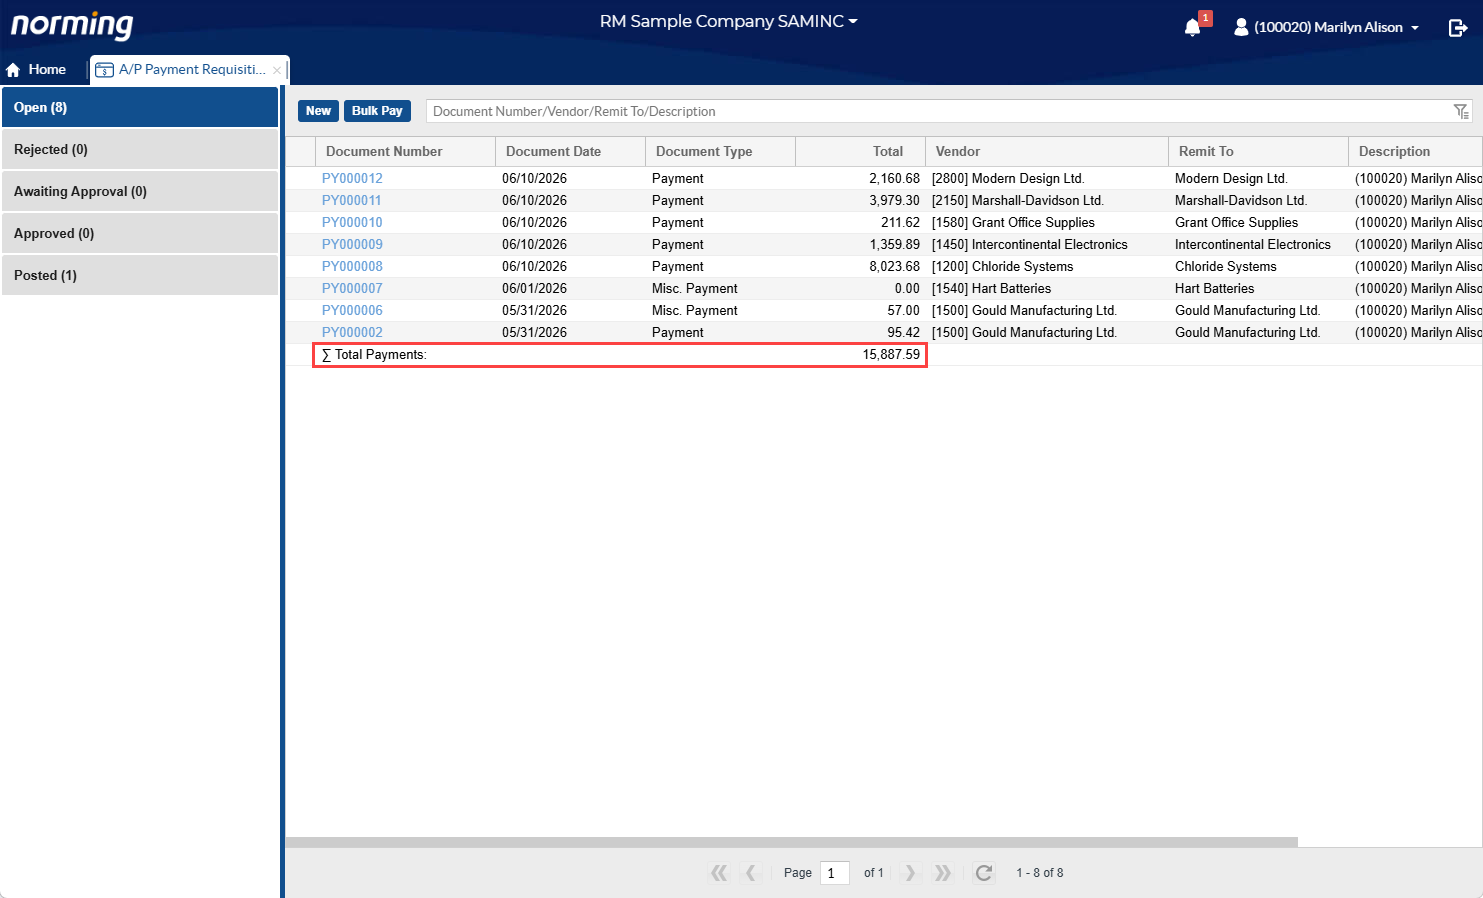
2. Payment Total is provided at the bottom of the Payment Requisition List.
Other Requisitions
A/R Invoice Requisition
1. Display Ship-To Location Details.
2. Allow to enter 'Retainage' invoice.
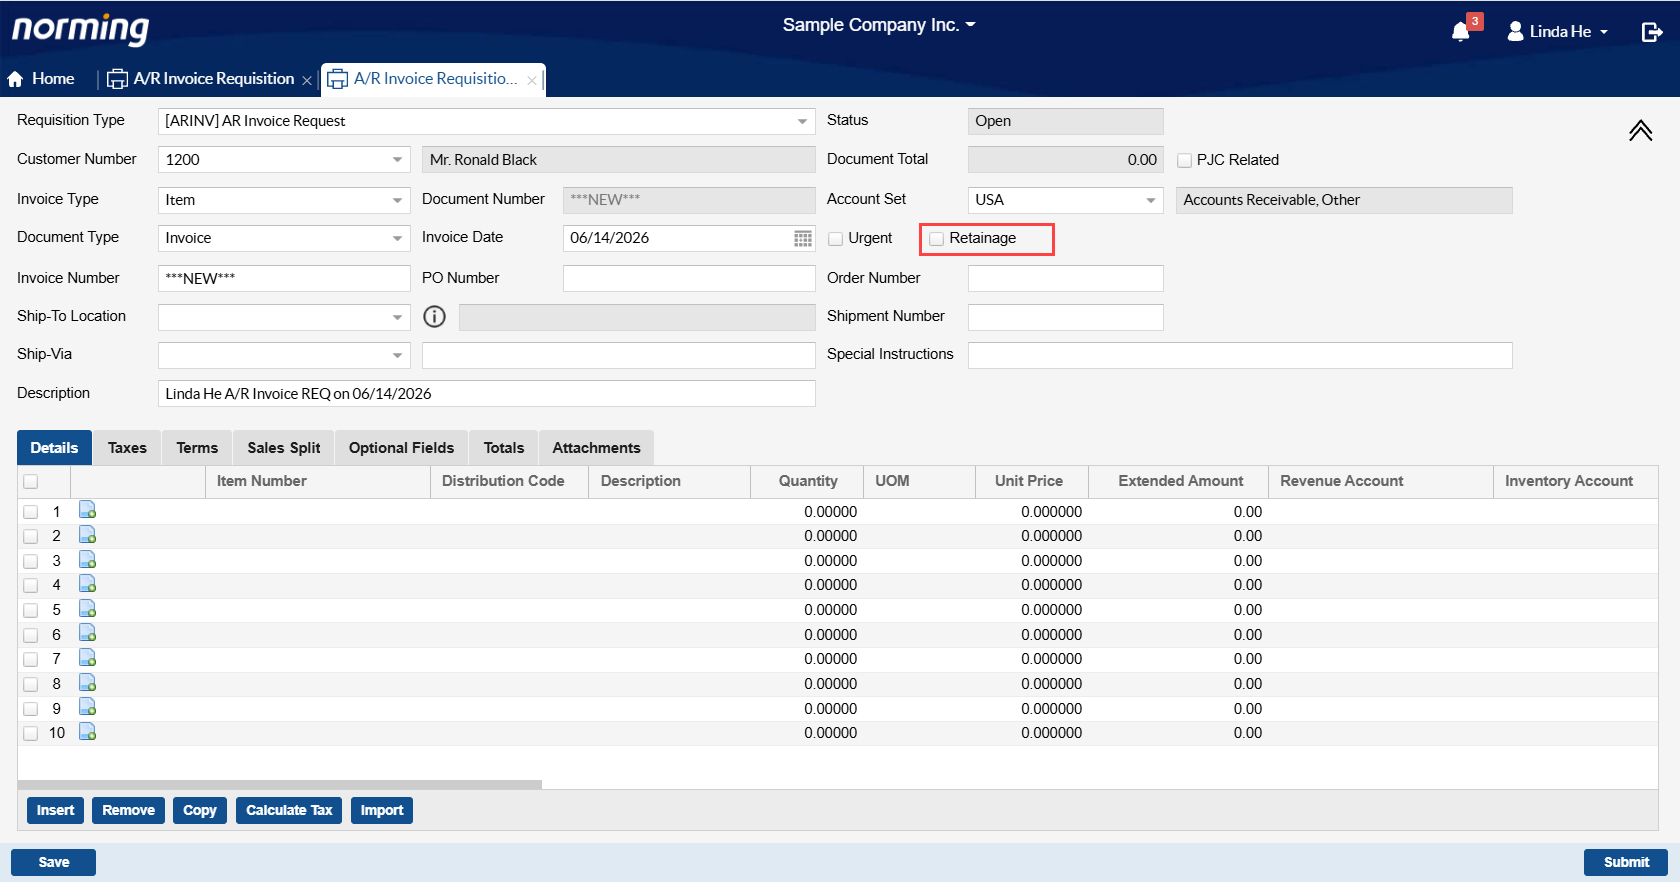
Notes:
● Only allow to specify the 'Retainage' flag in the above screen, the other retainage fields are not available in the Web AR Invoice Requisition screen.
● To use this function, make sure the 'Retainage' flag is enabled for ESS users in the Admin Portal/ESS Users.
G/L Journal Requisition
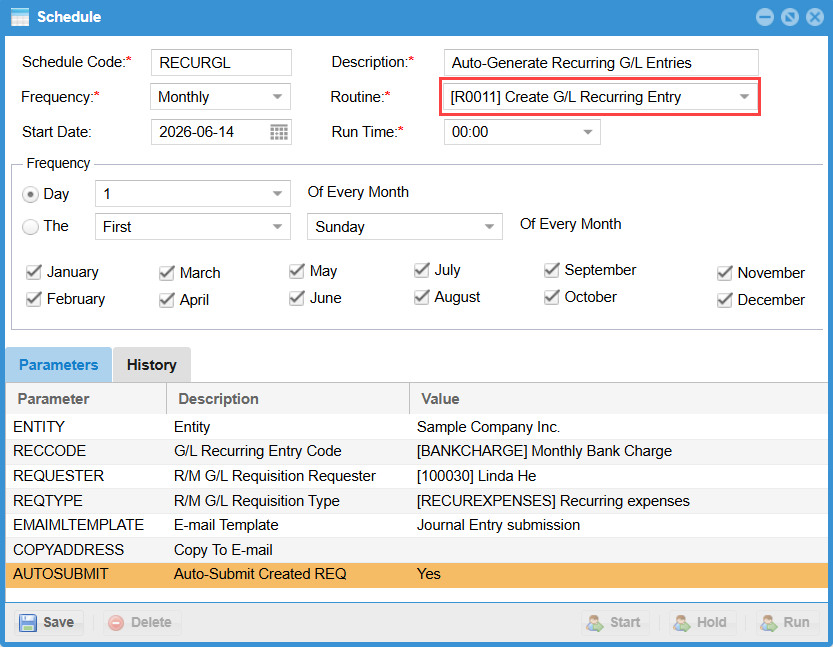
Provide the scheduler in the Admin Portal to auto-create G/L Journal Requisition from G/L recurring entry code defined in Sage 300 General Ledger.
Leave Request
Provide the capability to warn or force user to attach attachment(s) for particular leave types on submission or approval.

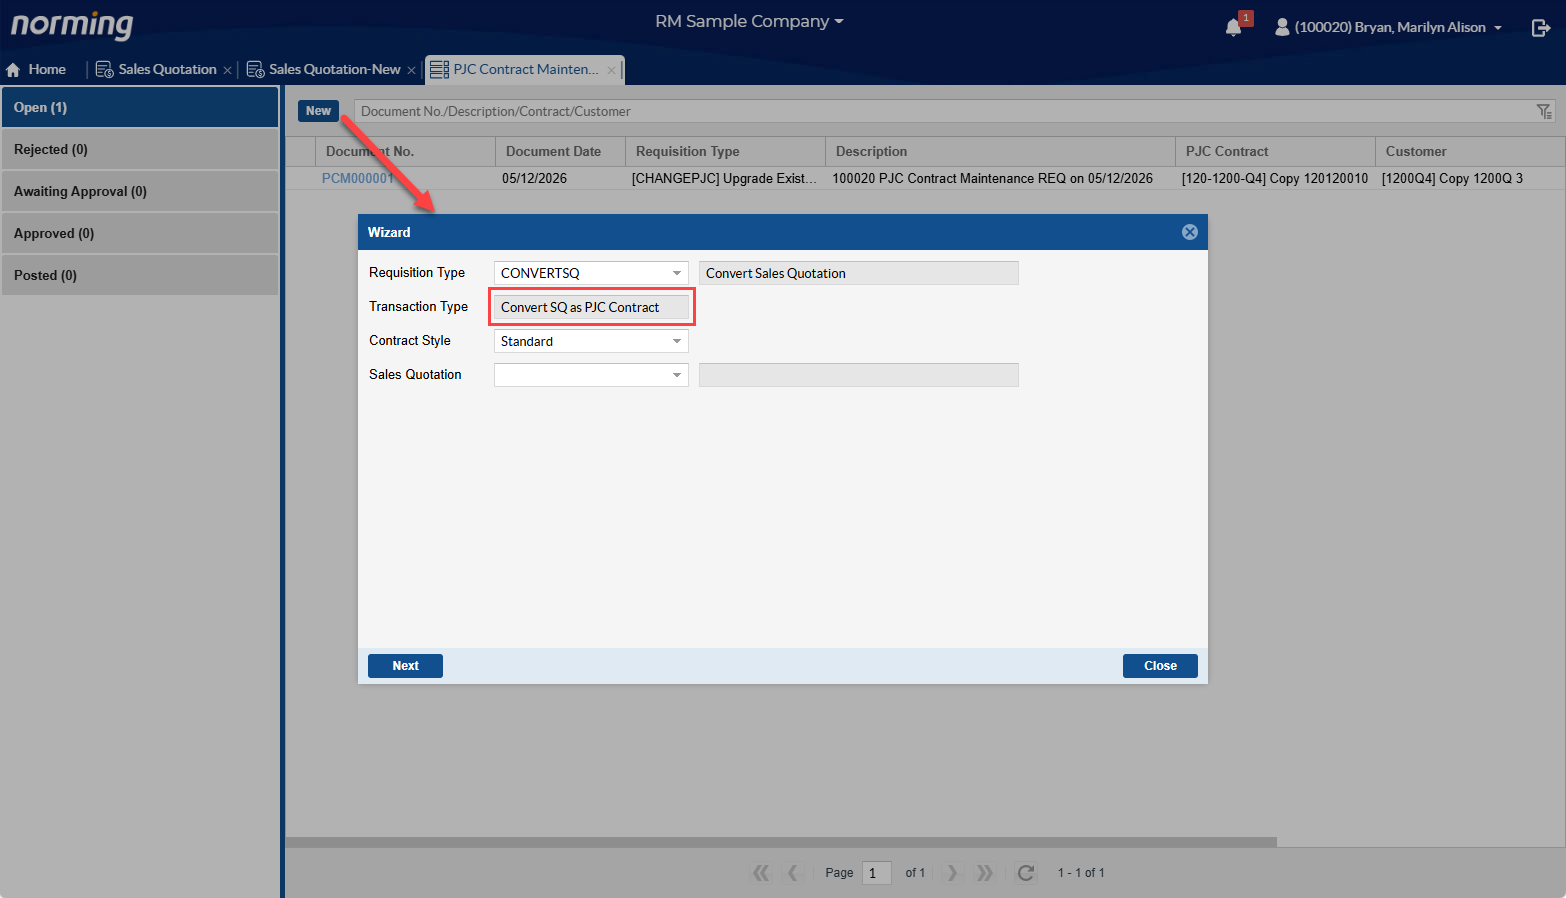
PJC Contract Maintenance Requisition
Allow to create a new PJC Contract Requisition from a Sales Quotation from within the PJC Contract Maintenance List.
Previous versions only allow to do that from the Sales Quotation screen.
Workflow
1. Allow users to draw back requests that haven't been fully approved.
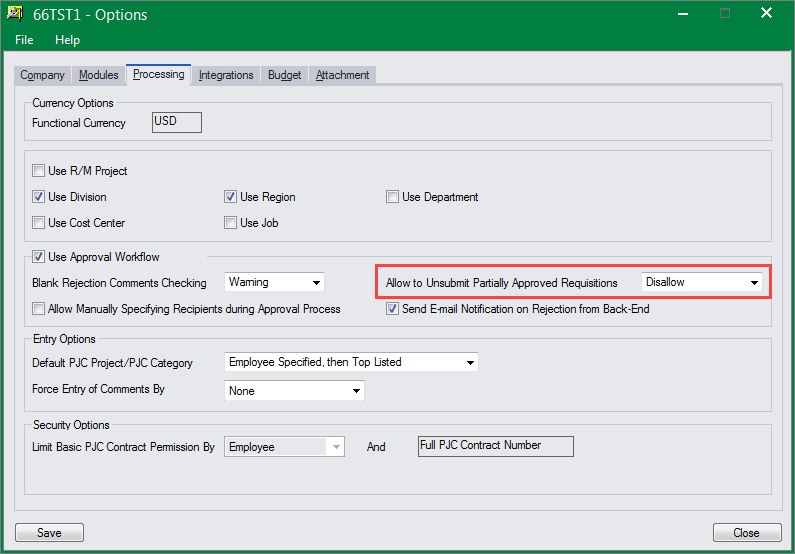
In previous versions, a request cannot be drawn back if it has been approved by any approver. With this enhancement, a request can be drawn back if it has not been fully approved.
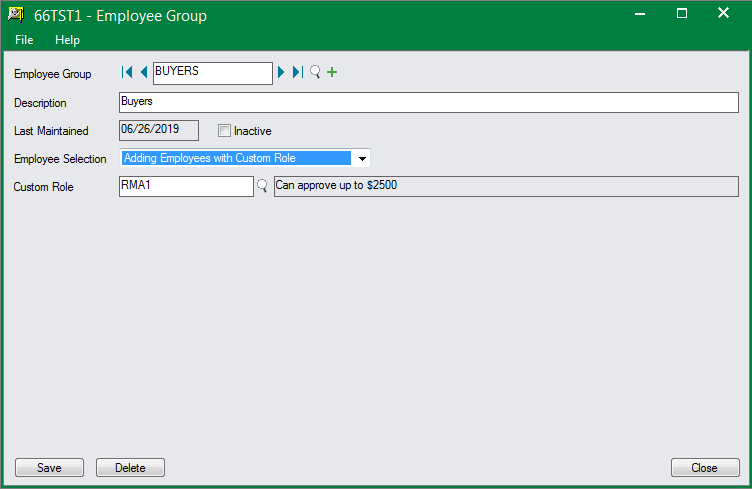
2. Enhance the 'Employee Group' to allow adding employees with a custom role, while previous versions only allow to add employees from employee register manually.
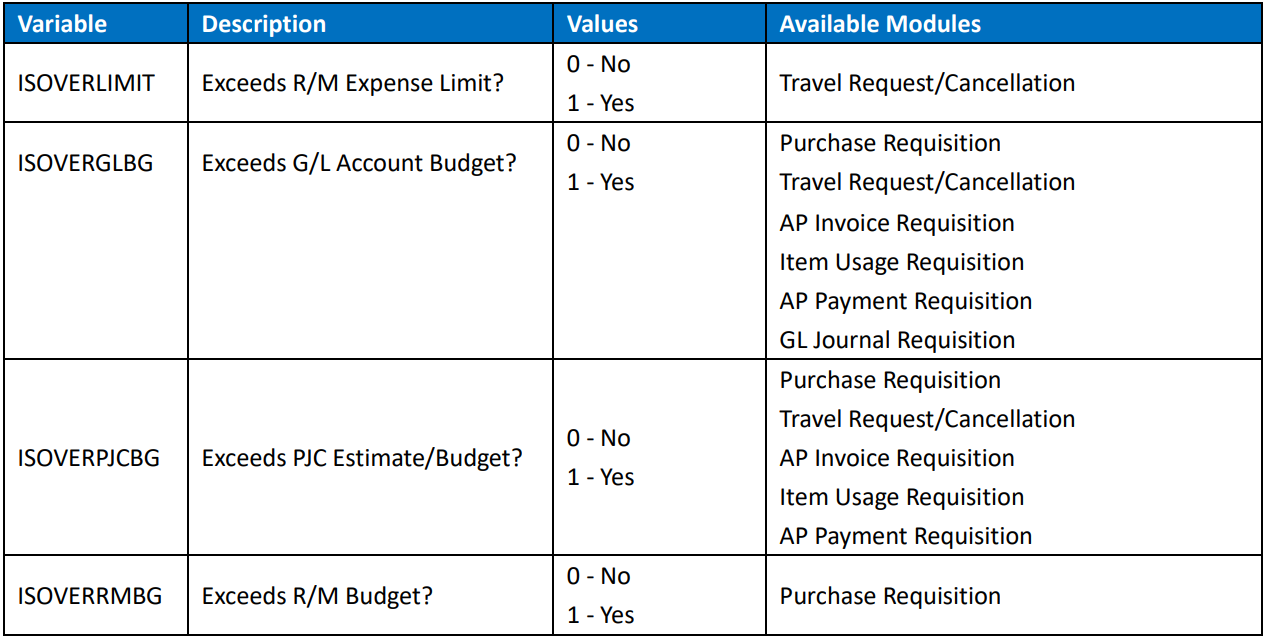
3. Provide more standard variables in Decision form to create conditional workflows:
Other Improvements
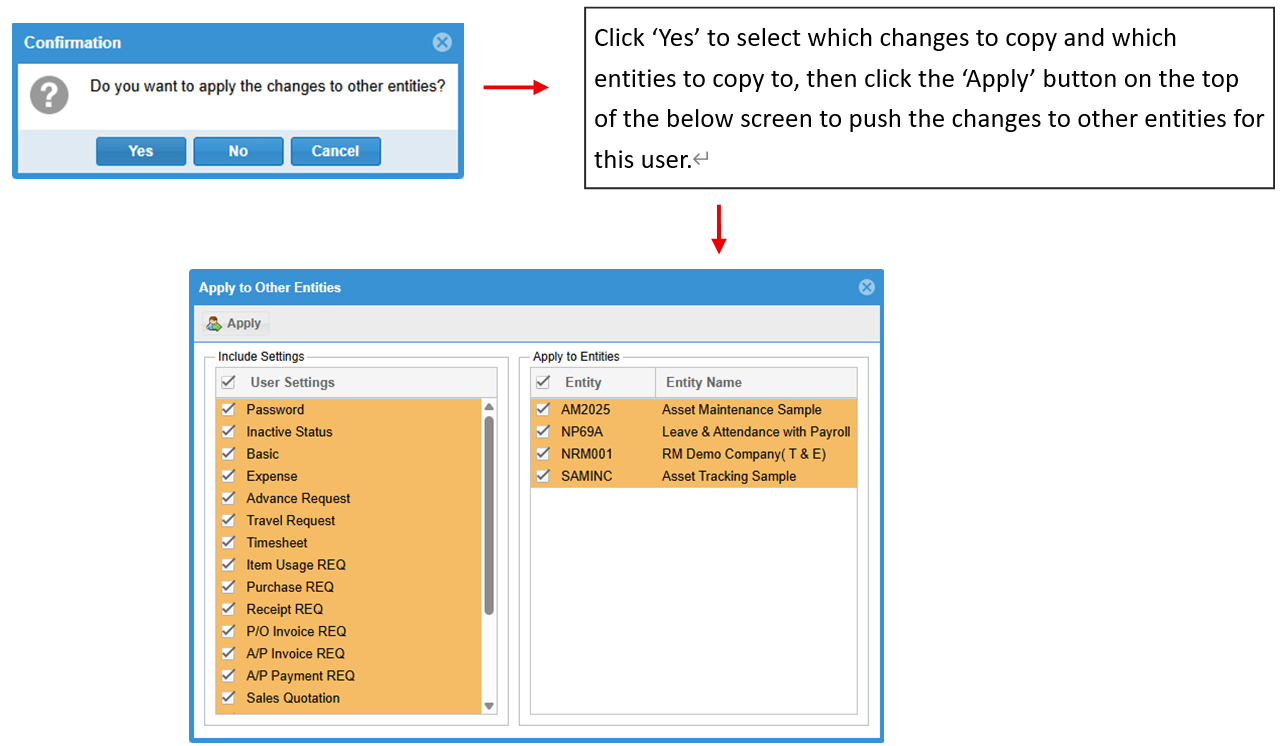
Admin Portal > Substitute Employees
Improve the way to apply substitute settings to other entities as follows:
Provide the 'Apply to Other Entities' button at the bottom right corner.
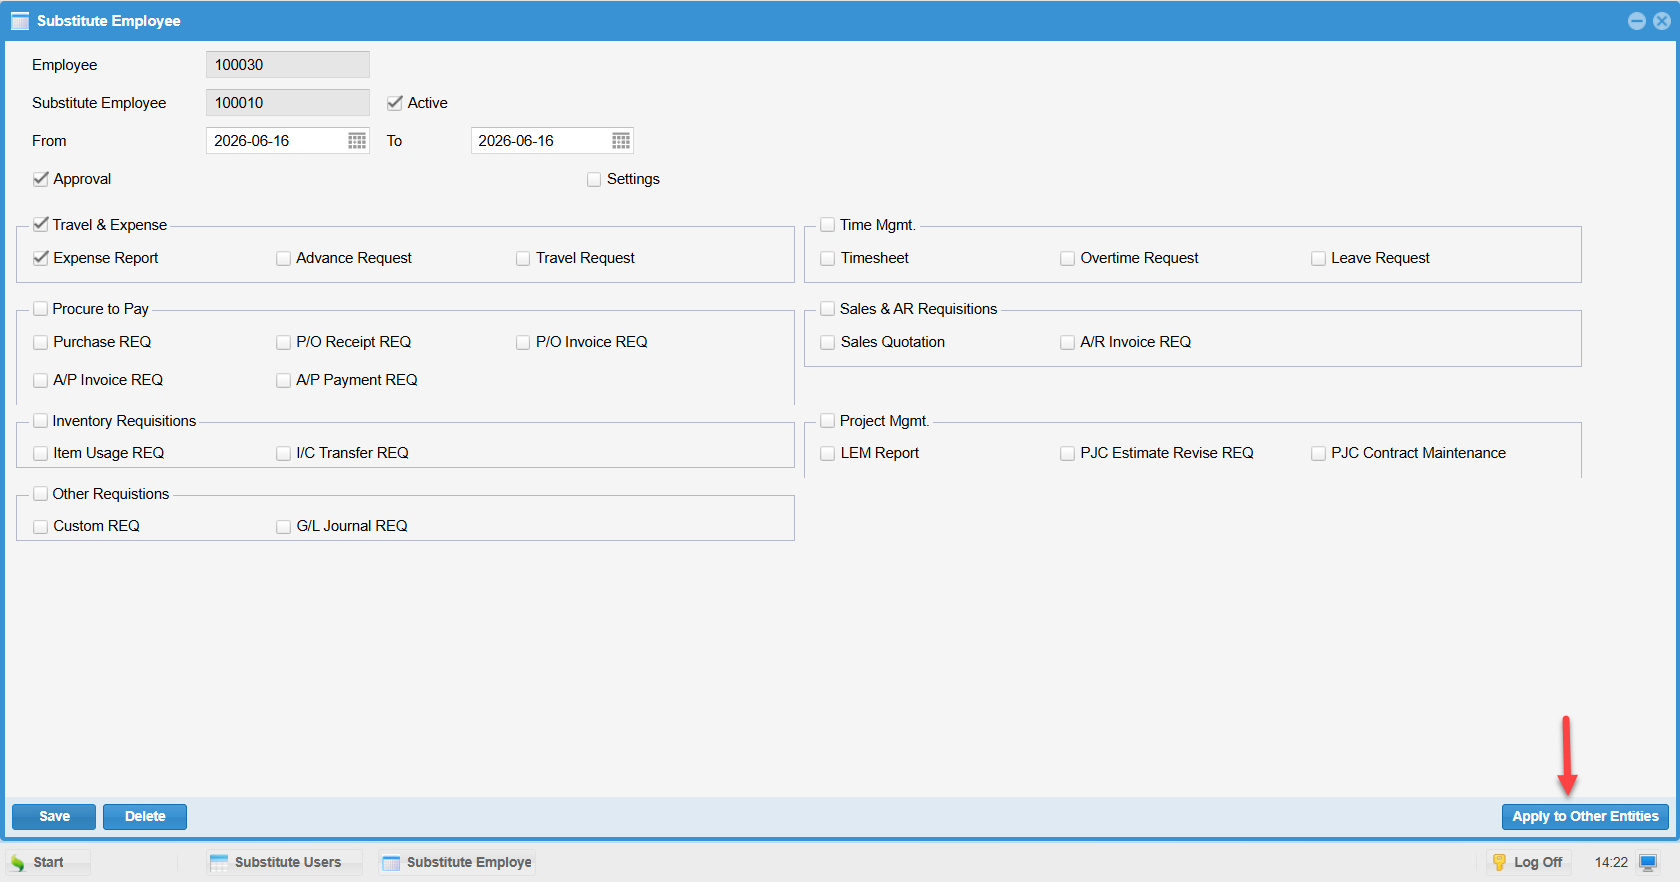
Upon clicking the button, the following form appears to select the entities to copy the substitute settings to.

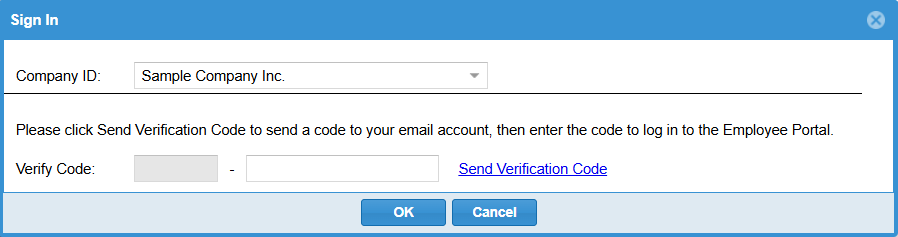
ESS Login
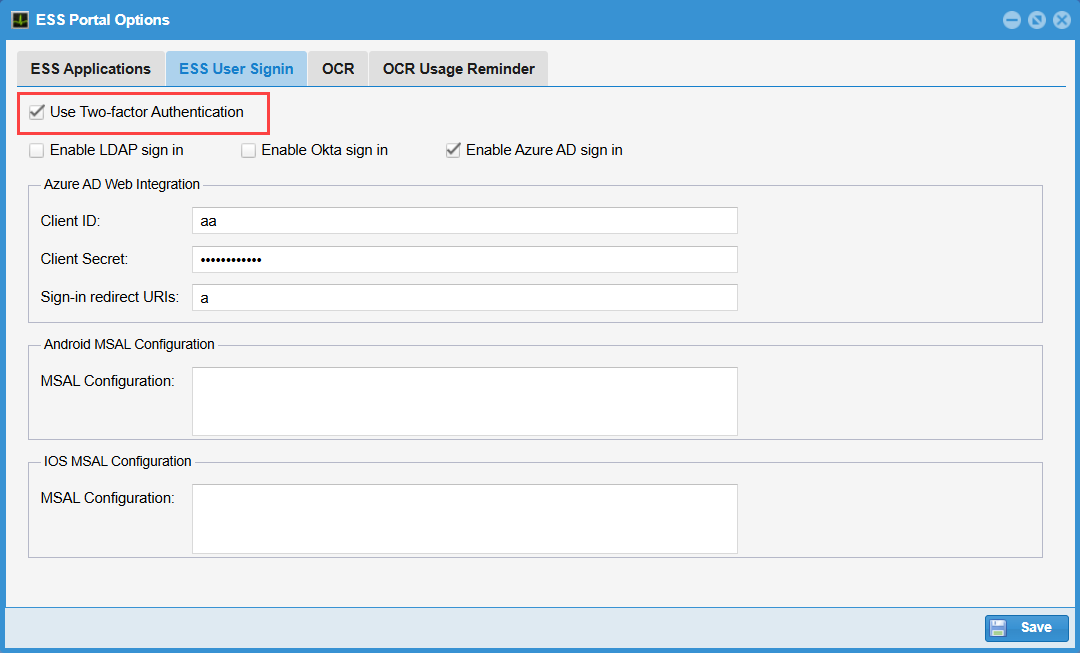
The verification code for the Two-factor Authentication has been improved to use a two-segment structure, while previous version only uses one segment.

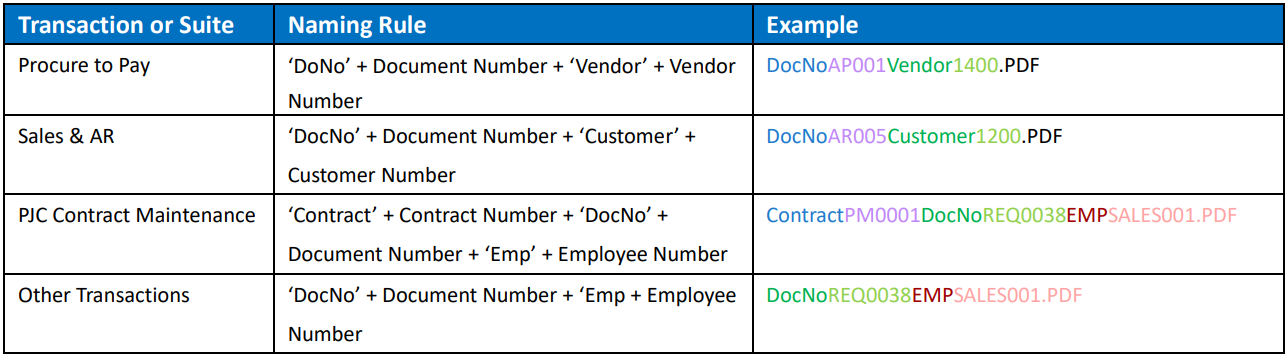
Report Naming
1. Improve the ESS Portal to use meaningful naming rules for the PDF files exported from the reports that are printed through ESS Requisitions.
Below are the naming rules:
2. Add two additional fields in the Backend > Requisition Status Report for all transactions, Submitted Date and Approved Date.
Email Alert
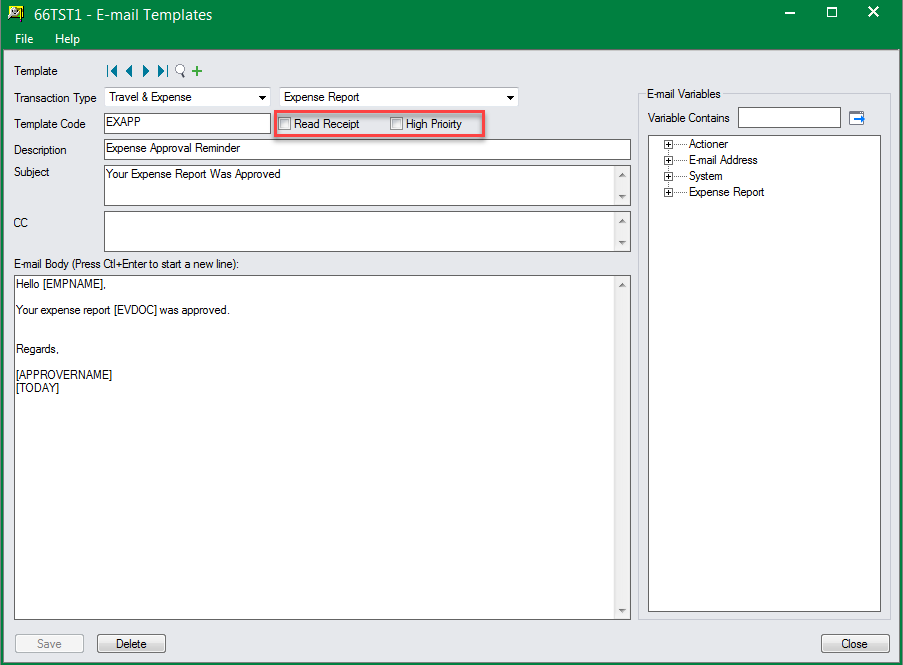
1. Provide two options - 'Read Receipt' and 'High Priority' in E-mail templates. Emails using such templates will be flagged as high priority and/or to request read receipt.
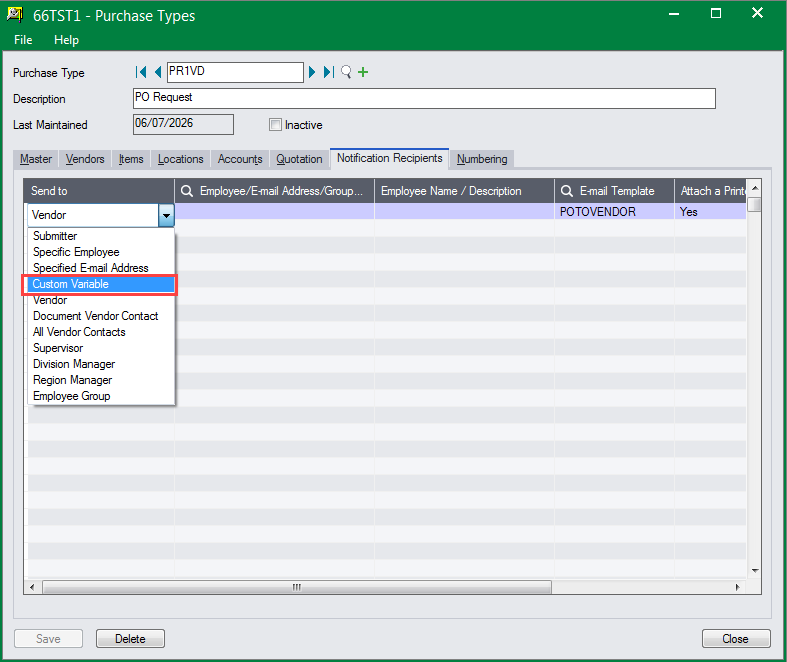
2. One more type of recipient (Custom Variable) is provided in Requisition Types to specify the persons to send email to (during posting process) with SQL script.
This new feature is available in Purchase Requisition Type, AP Invoice Requisition Type, and etc.
Allow to Upload Attachments for Approved/Posted Requests
From this version on, the feature mentioned above is supported in the following transactions:
a. PJC Estimate Requisition
b. PJC Contract Maintenance Requisition
c. Expense Report
d. Advance Request
e. Travel Request
f. Timesheet
g. IC Transfer Requisition
h. Item Usage Requisition
i. GL Journal Requisition
This feature has already been provided in the following transaction in previous versions:
● Purchase to Pay Suite:
Purchase Requisition, PO Receipt Requisition, PO Invoice Requisition, AP Invoice Requisition and Payment Requisition
● Sales & AR Suite:
Sales Quotation & AR Invoice Requisition
Sage 300 Related Improvements
Web Screen
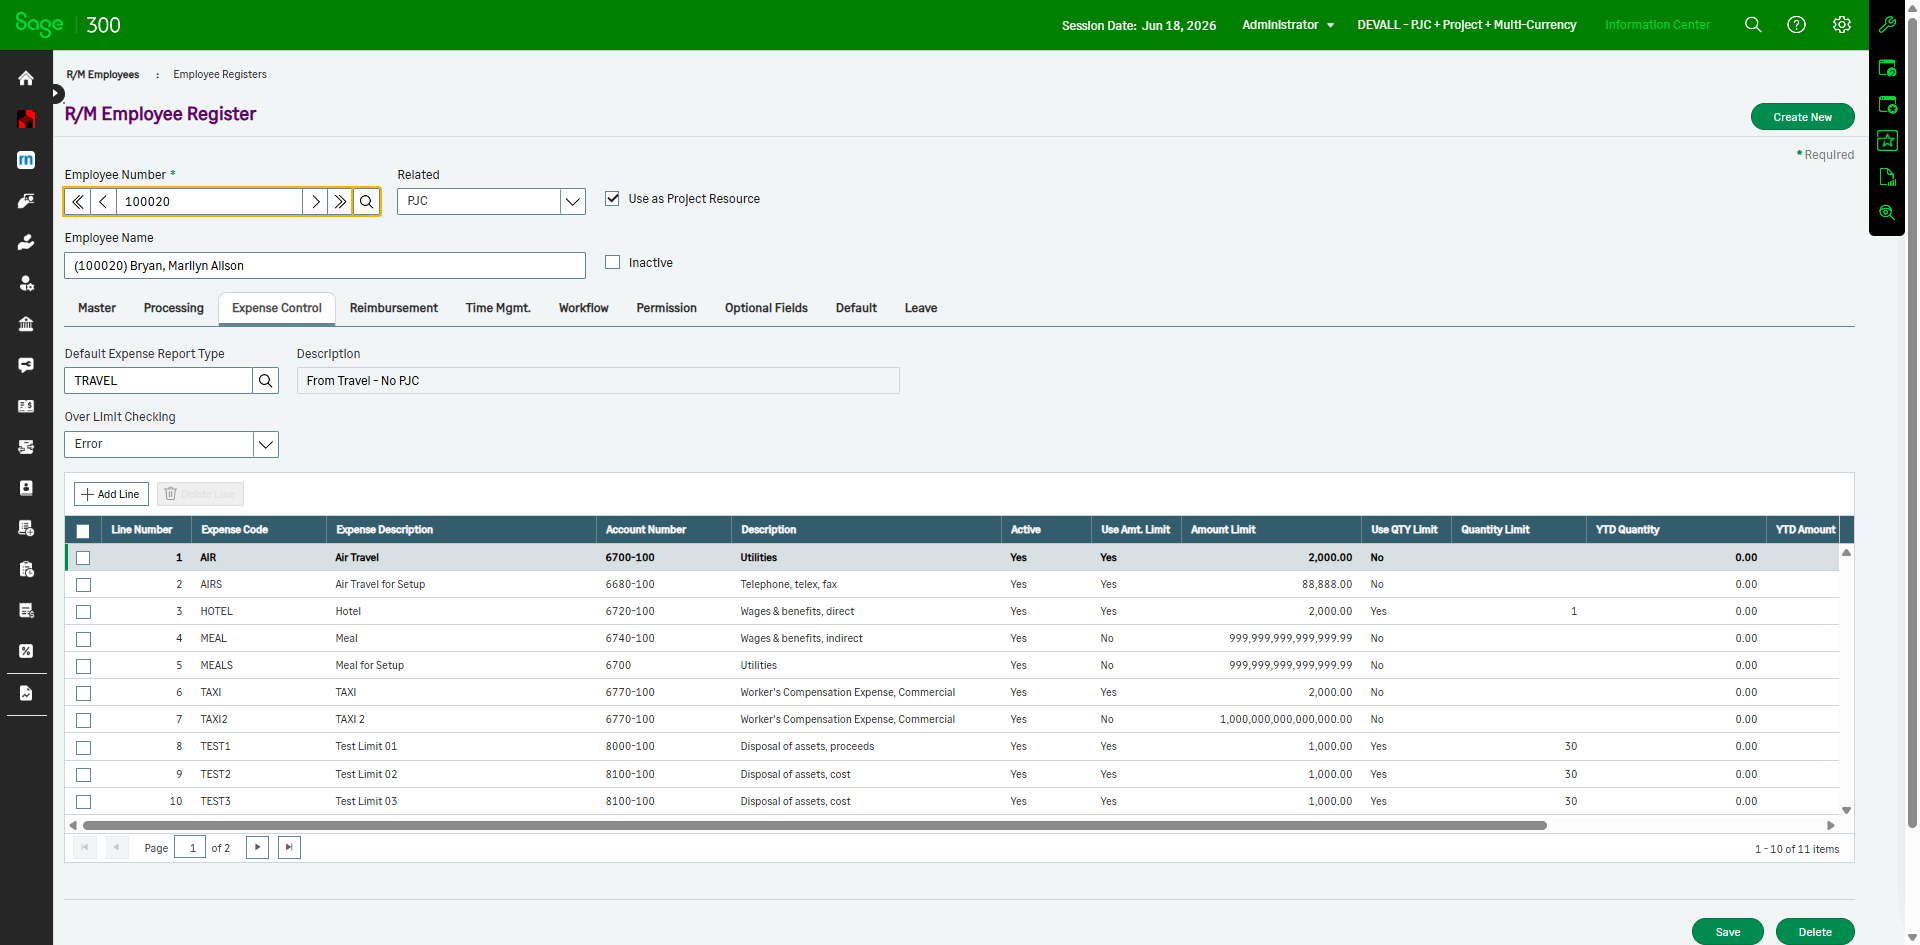
Employee Register functionality is now available in the Web Screen.
R/M Backend
1. The 'Sort by' drop down list is provided in all the Requisition List screens to easily search requisitions.

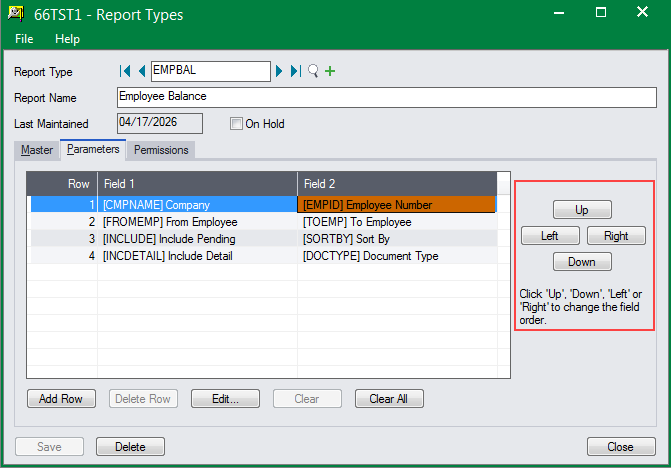
2. Four buttons (Up, Down, Left and Right) are provided in the Custom Report Type > Parameters page to change the parameters' displaying order in the Web Custom Report screen. In previous versions, to change the displaying order, you have to remove the parameters first then re-add them to the place where you want to display.
R/M Module-Level Prerequisite
With this release, the prerequisite requirements for the following R/M modules have been reduced to Sage 300 System Manager and one LANPAK:
● Travel Reqeust
● Expense Report
● Cash Advance
● Timesheet
● Overtime
● Leave Reqeust
● Custom Requisition
● Custom Report
Sage 300 Integration
Resource Manager 2026 integrates with the following Sage 300 versions:
● Version 6.0 ● Version 2012 ● Version 2014
● Version 2016 ● Version 2017 ● Version 2018
● Version 2019 ● Version 2020 ● Version 2021
● Version 2022 ● Version 2023 ● Version 2024
● Version 2025 ● Version 2026